
Create an event
Everything starts with an event: it holds your tickets, your ticketing page, your attendees and your messages. Sweescape offers two ways to create one, depending on whether you sell tickets or already have your guest list.
Choose the right type of event
Section titled “Choose the right type of event”When you click Create one event, the Create your event window offers two choices.
| Event with ticketing | Import participants | |
|---|---|---|
| What it is for | Selling tickets, paid or free, on your ticketing page | Welcoming a guest list you already have (CSV or Excel file) |
| Ticket tab | Yes: tickets, codes, ticketing page | No |
| Payment | Collected on your Stripe account | None |
| Attendees | Buyers arrive on their own; you can also add people by hand | The people in your file, then more by file or by hand |
| Attendee fields | First name, last name, email, plus your custom fields | The columns of your file |
| Plan required | An active paid plan | Any plan |
Both types of event have the Participants, Invitation, Automation, Extensions and Settings tabs, and their tickets are scanned with SweeScan.
Create an event with ticketing
Section titled “Create an event with ticketing”Before you start, you need an active paid plan and a connected Stripe account to receive the money from your sales. See Connect Stripe.
-
On the Events page, click Create one event.
-
Choose Event with ticketing (“Create from scratch →”).
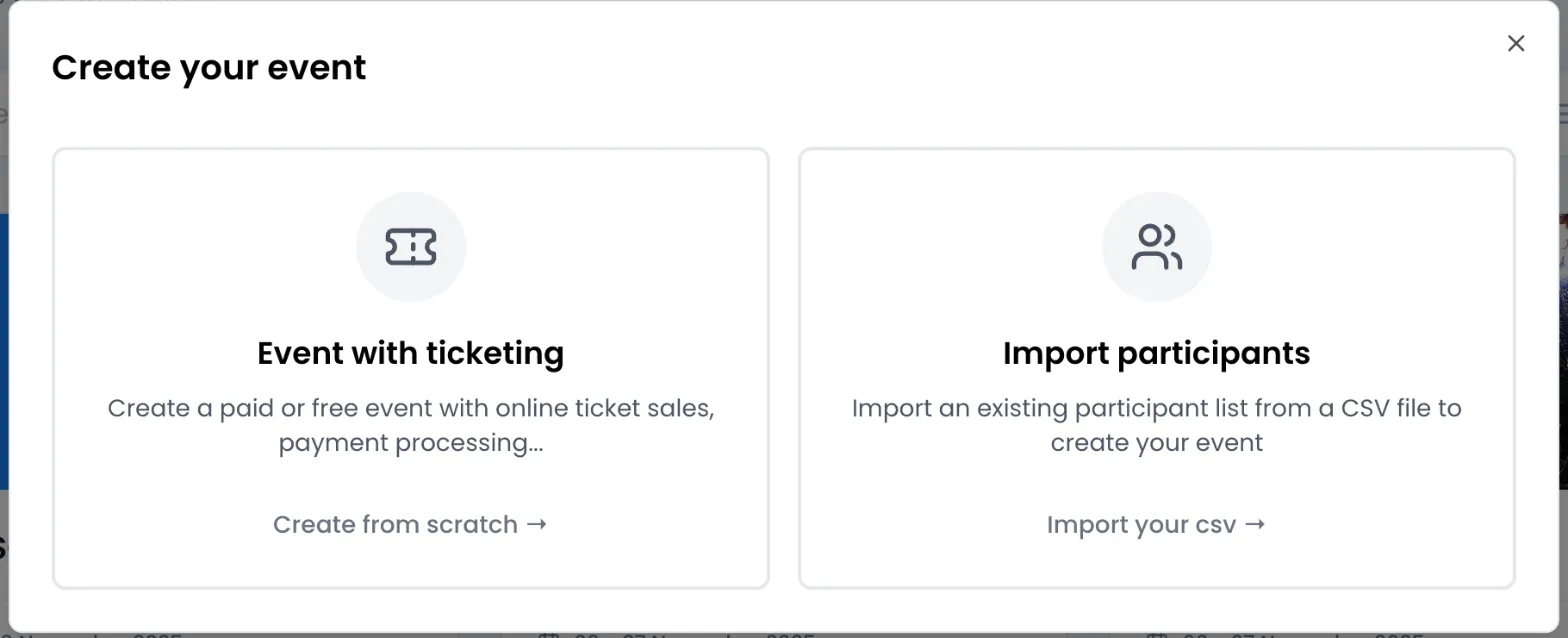
If the card shows Ticketing Locked and “Upgrade plan →”, your plan does not include ticketing: clicking it opens the subscription window. See Plans and subscription.
If no active Stripe account is connected, the window shows Stripe Configuration Required. Click Configure Stripe to go to the settings, connect your account, then come back to create the event.
-
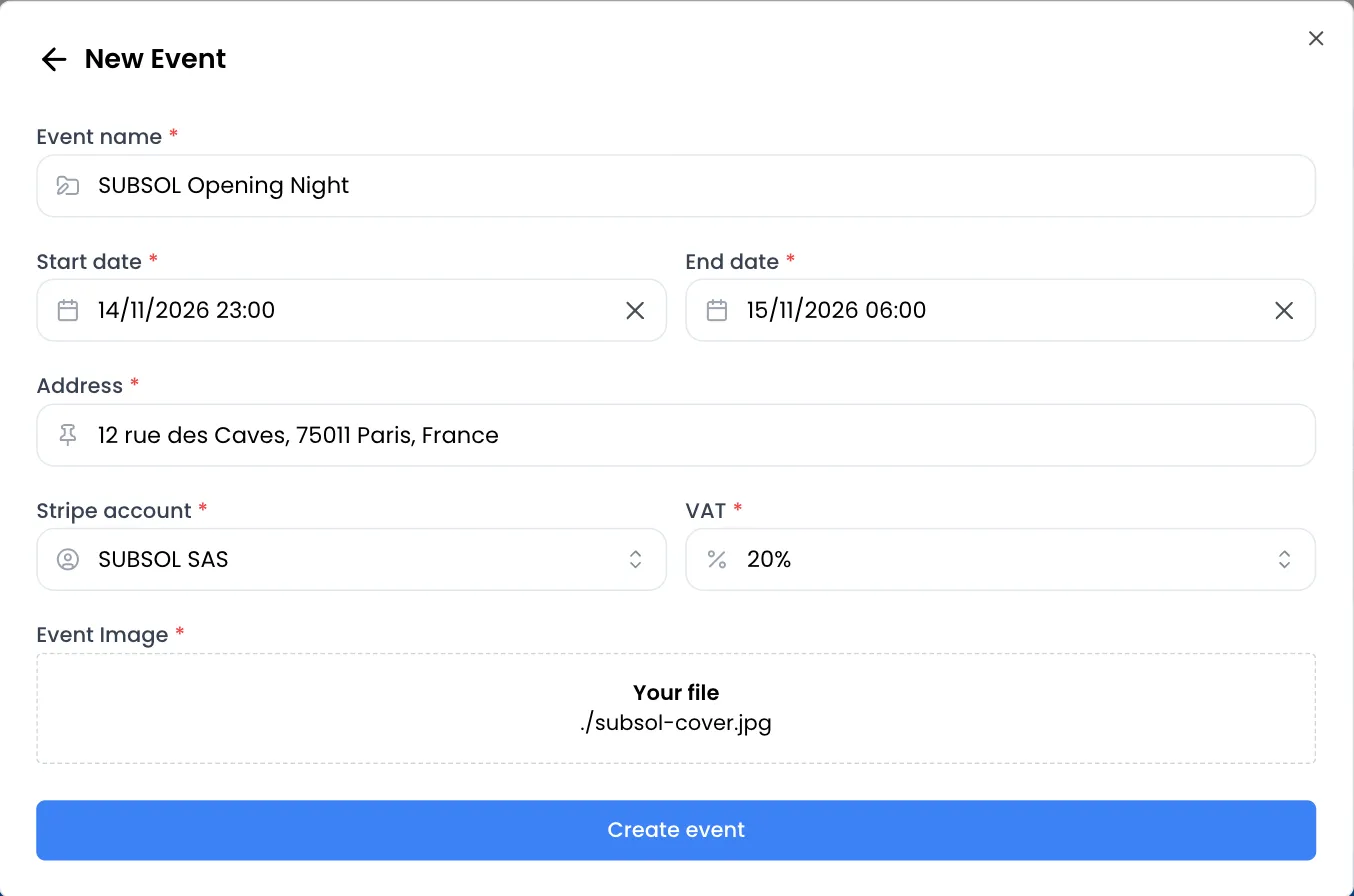
Fill in the New Event form (each field is detailed below).
-
Click Create event. The button stays greyed out while a required field is empty or invalid.
The message “Event created successfully!” appears and the event opens. It has no tickets and no ticketing page yet: that is the next step.
The form fields
Section titled “The form fields”| Field | What you need to know |
|---|---|
| Event name | At least 2 characters. This is the name shown in your dashboard, your analytics and your messages. You can change it later. |
| Start date | Date and time. It must be in the future. |
| End date | Date and time, equal to or after the start date. It determines whether the event is upcoming, ongoing or past. |
| Address | Type the address, then pick a suggestion from the list that appears after a second. Sweescape places it on the map: if it cannot be found, the event is not created. |
| Stripe account | The account that collects this event’s sales. All your connected accounts are listed, but only an active account is accepted. |
| VAT | The rate applied to your tickets: 20%, 10%, 5.5%, 2.1% or 0%. You enter prices including VAT: the VAT is taken out of the price. See Prices, VAT and fees. |
| Event Image | JPG or PNG, 1 MB maximum. Recommended size: 1920 x 1080 px. Optional despite the asterisk: without an image, a default image is used. |
Create an event from a guest list
Section titled “Create an event from a guest list”Use this option for an event without online sales: a private party, a seminar, a guest list sent by a partner. It is available on every plan.
-
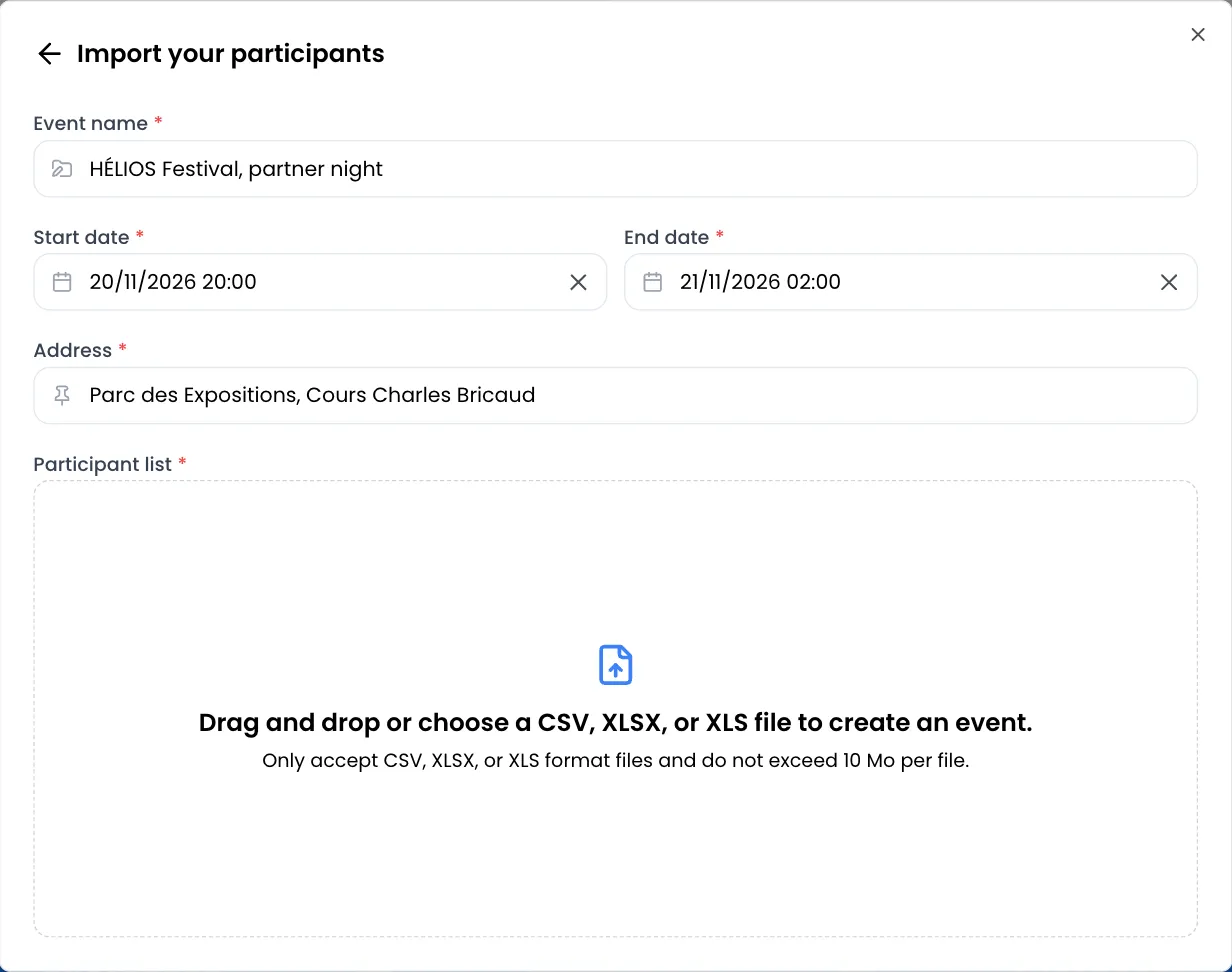
On the Events page, click Create one event, then choose Import participants (“Import your csv →”).
-
In Import your participants, fill in Event name, Start date, End date and Address. The rules are the same as for an event with ticketing.
-
Drop your file into the Participant list area, or click it to choose the file. Until the fields above are valid, the area stays inactive and shows “Please enter an event name before inserting a file.”
There is no confirm button: the event is created as soon as the file is dropped. The message “Event imported successfully” appears and the event opens on your attendee list.
Prepare your file
Section titled “Prepare your file”- Accepted formats: CSV, XLSX or XLS. For an Excel file, only the first sheet is read.
- The first row holds the column names: “First name”, “Last name”, “Email”, “Phone”, “Company”… Each following row becomes an attendee.
- Each column becomes a required text field of the event. These columns cannot be changed afterwards: any file you import into this event later must have exactly the same ones.
- For a CSV, the separator (comma, semicolon…) is detected automatically and empty rows are skipped. Save it as UTF-8 to keep accented characters (in Excel: “CSV UTF-8”), or drop the XLSX file directly.
- The screen states a limit of 10 MB per file.
Common error messages
Section titled “Common error messages”| Message | What to do |
|---|---|
| The start date and time must be later than the current date and time | The start date is in the past: choose an upcoming date and time. |
| The end date must be after the start date | The end date is before the start date. |
| Invalid address, please enter a valid address! | The address could not be found on the map. Pick one of the suggestions. |
| The stripe account is inactive, please retry with a valid stripe account! | Finish setting up this account in Stripe, or choose another one. |
| The invoice company does not exist, complete your company information on settings stripe! | Fill in your company information for this Stripe account in the settings, then try again. |
| File is too large, please retry with a smaller file! | The image is over 1 MB: compress it. |
| Invalid file extension, please retry with a png or jpg file! | The image is neither JPG nor PNG. |
| Invalid csv data, please retry with a valid csv, xlsx, or xls file! | The file contains no readable attendee row. |
| Invalid file extension, please retry with a csv, xlsx, or xls file! | The file is not a CSV or Excel file. |
What next?
Section titled “What next?”For an event with ticketing, we recommend this order:
- Create your tickets in the Ticket tab.
- Choose the information you ask buyers for, before the first sale.
- Build your ticketing page, then publish it.
- Prepare the invitation email your buyers will receive.
You can also invite a collaborator to prepare the event together.