
The purchase flow
This page describes a purchase from the buyer’s point of view: choosing tickets, the form, payment, confirmation and the emails received. It helps you test your ticketing page and answer your customers’ questions.
The purchase happens in a window that opens over your ticketing page, full screen on mobile. The texts in this window are shown in French, English or Spanish, depending on the language of the buyer’s browser.
Step 1: choose tickets
Section titled “Step 1: choose tickets”The buyer clicks a button on your page set to the Open ticketing action. See Page blocks.
The Ticketing window opens with the event name and date, then the list of tickets on sale:
- each ticket shows its name, its description and its price followed by Incl. taxes;
- the + and − buttons set the quantity, within the remaining seats;
- a sold-out ticket is greyed out with the Sold out badge;
- tickets hidden behind a code do not appear until a valid code has been entered.
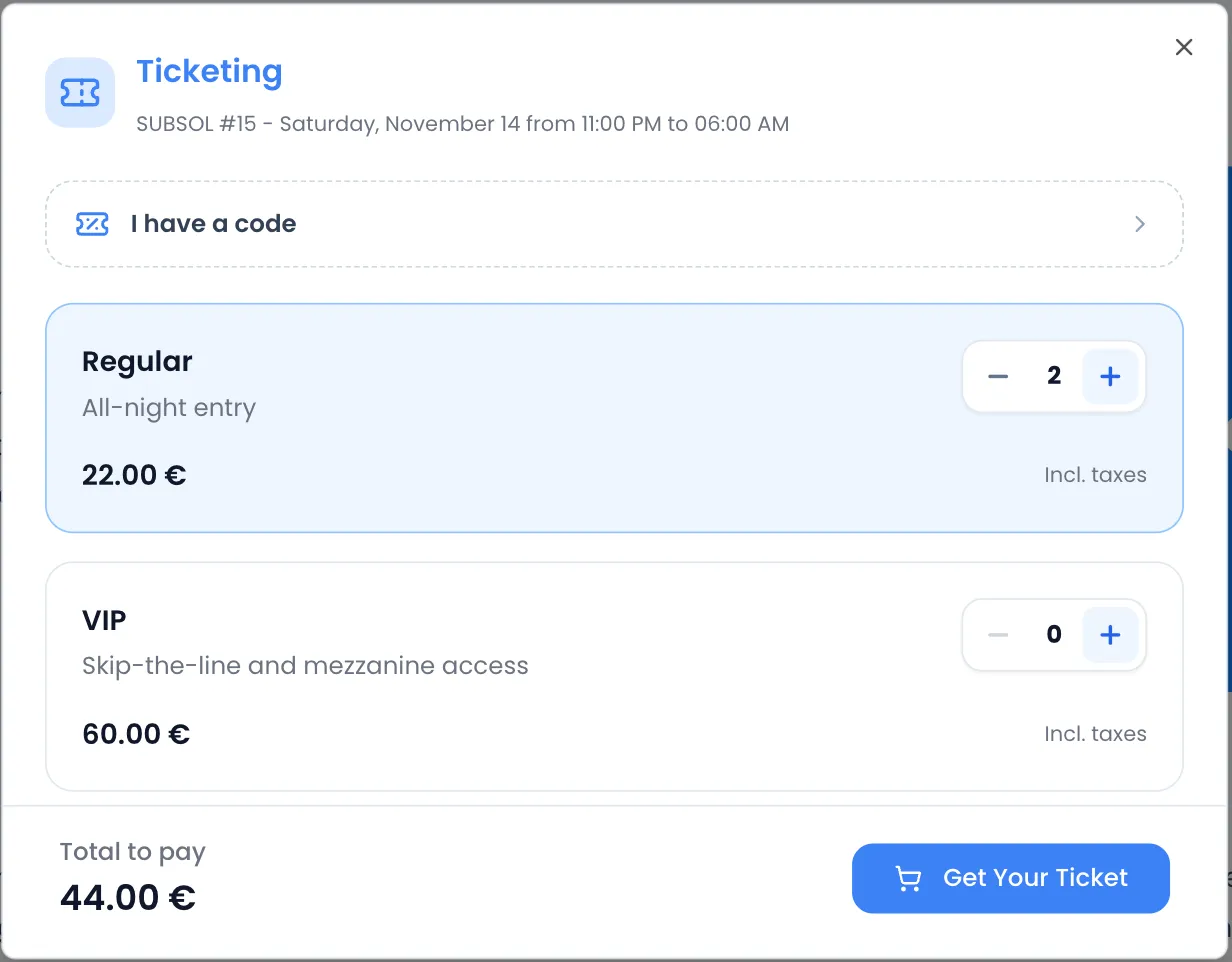
At the bottom of the window, Total to pay shows the amount, with a Discount : line if a code applies. The Get Your Ticket button stays disabled while no ticket is selected or while a quantity does not meet the ticket’s per-order minimum or maximum.
Enter a code
Section titled “Enter a code”The I have a code button, at the top of the list, opens a field to type the code and the Apply button. The code is entered before choosing tickets, because it can reveal new ones. There is no other code field later in the flow. See Discount and access codes.
With a seating plan
Section titled “With a seating plan”If a seating plan extension is installed on the event, the buyer picks their seats on the plan shown in the page. The purchase window then opens directly on the form. If a seat has just been taken by someone else, the message “This seat is no longer available, please choose another one.” appears. See Extensions.
Seats are held for 10 minutes
Section titled “Seats are held for 10 minutes”When the buyer clicks Get Your Ticket, their seats are held and a countdown appears: Time remaining to finalize your order, starting from 10:00.
- During these 10 minutes, nobody else can buy these seats.
- In the last two minutes, the countdown turns red with “Hurry! Your order is expiring soon.”.
- At zero, the page reloads and the selection is lost: the buyer has to start again.
Possible messages at this step:
| Message | Cause |
|---|---|
| “One or more tickets have insufficient stock!” | Someone bought the last seats in the meantime. The selection is cleared and the remaining seats are refreshed. |
| “One of these tickets requires a valid code!” | A hidden ticket was selected without a valid code. |
| “This code has reached its limit!” | The code’s quota ran out in the meantime. |
Step 2: the registration form
Section titled “Step 2: the registration form”The Registration Form collects the attendees’ details and the billing details.
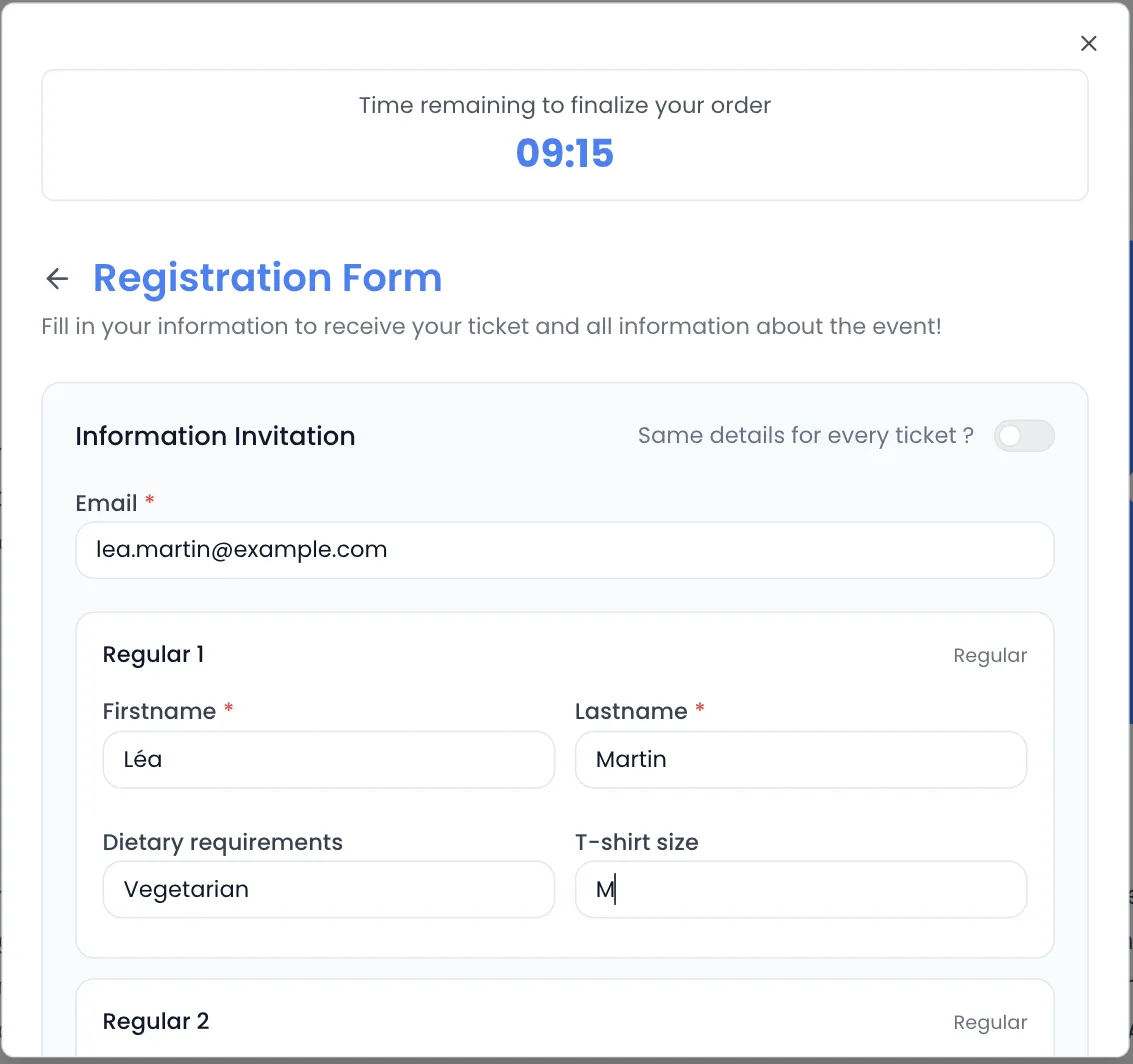
Information Invitation
- Firstname, Lastname and Email are always required. Tickets are sent to this email.
- Your custom fields appear below, with an asterisk if they are required: text, number, date, yes / no choice or drop-down list.
- Fields set to Per ticket are asked once for each ticket bought, in one box per ticket. When the order has several tickets, the Same details for every ticket ? switch lets the buyer fill them in only once.
See Custom fields.
Information Facturation
- Fullname and Email: they are used for the invoice, which is sent to this email.
- With the You are an organization ? switch, the Fullname field becomes Organization and a Billing Address is required: Line, City, Zip Code, State, Country (France, United Kingdom or Spain) and Siren (SIREN number or European VAT number). All these fields are required.
Final checks
- If a discount code applies, the Code applied box shows the code and the amount taken off.
- The Accept terms and conditions box must be ticked to enable the Book your ticket button. The link opens a terms page provided by Sweescape, which describes the data collected during the purchase.
- The arrow at the top left cancels the reservation and goes back to ticket selection.
Step 3: payment
Section titled “Step 3: payment”After Book your ticket, the Stripe payment form appears in the same window, with the Total price : and the Pay button.
- The payment methods offered depend on your Stripe account settings.
- Card details are entered in the Stripe form: they never go through Sweescape.
- If the bank asks for authentication (3-D Secure), it happens in the window or on the bank’s page, which then sends the buyer back to the confirmation.
When the order totals €0 (free tickets or a 100% discount), this step does not exist: the buyer goes straight to the confirmation.
Step 4: the confirmation page
Section titled “Step 4: the confirmation page”Once the payment is accepted, the buyer lands on the Ticket validation page: “Your ticket has been successfully validated. Please find the invitation in your mailbox.”
- Home page takes them back to your ticketing page.
- More information opens an email addressed to Sweescape support, not to you.
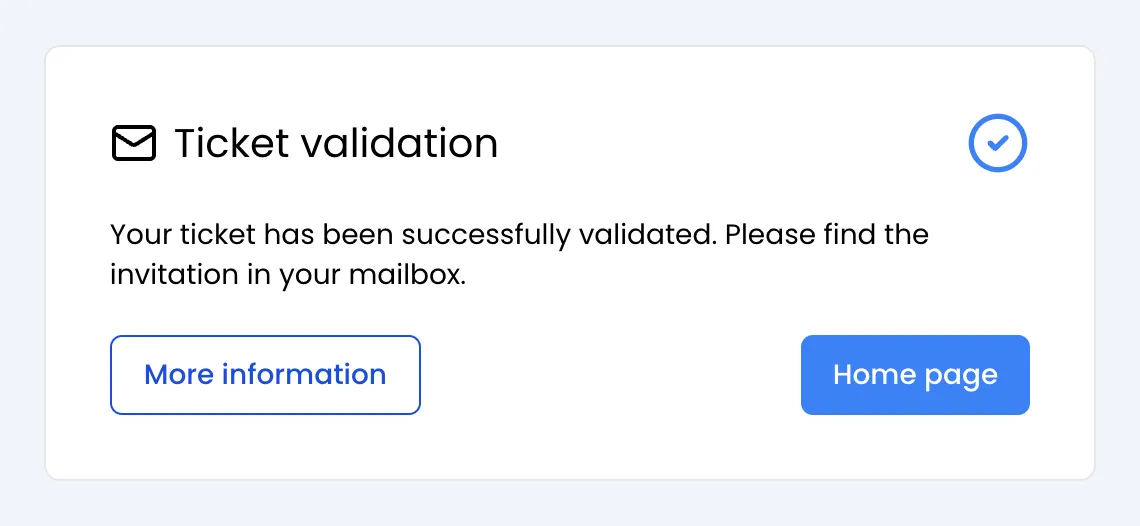
An extension installed on the event can add content below this message.
Step 5: what the buyer receives
Section titled “Step 5: what the buyer receives”One attendee is created for each ticket bought. They appear in the event’s Participants tab. For a paid order, this happens as soon as Stripe confirms the payment. For a free order, immediately.
- The tickets: each attendee receives the email you designed in the Invitation tab, with their ticket attached as a PDF, built from your ticket template. The ticket’s QR code is scanned at the entrance with SweeScan. See Design the email and the ticket and Scan tickets.
- The wallet: if your email contains the Apple Wallet and Google Wallet buttons, the buyer can add their ticket to their phone’s wallet. See Tickets in the wallet.
- The invoice: for a paid order, the invoice and then the payment receipt are sent to the billing email. See Prices, VAT and fees.
Each ticket is sent in a separate email, to the attendee’s email address. A buyer who takes 3 tickets under the same email therefore receives 3 emails, one per ticket. If the email is asked Per ticket, each holder receives their own ticket.
Declined payment or abandoned purchase
Section titled “Declined payment or abandoned purchase”Declined payment. An error message appears in the window. No ticket is issued until Stripe has confirmed the payment. When Stripe reports the failure, the order is marked as failed and its seats go back on sale. If the failure happens after going through the bank’s page, the buyer lands on an error page with the Contact us and Return buttons.
Abandoned before payment. If the buyer closes the window, leaves the page or goes back with the form’s arrow, their seats are released immediately. Otherwise, they are released at the end of the 10 minutes.
Abandoned at the payment step. Once the Stripe form is displayed, the seats stay held in case the payment goes through. They are released automatically about one hour and ten minutes after the order started.
Sweescape does not send reminders to buyers who abandon. Abandoned carts are counted in SweeAnalytics. See Conversions.
Test your ticketing page
Section titled “Test your ticketing page”Make a test purchase before announcing your event, from a private browsing window.