
Pixels and tracking scripts
You can add your own measurement and advertising tools to the ticketing page: Google Tag Manager, the Meta pixel, Google Analytics 4 or any other code meant for a page’s <head> tag. Sweescape then displays a cookie banner to ask your visitors for their consent.
What this field does, and what it does not do
Section titled “What this field does, and what it does not do”- It adds your code to the
<head>of the ticketing page, exactly as you pasted it, once the visitor has consented. The code then runs as on any website: a Meta Pixel or GA4 base code usually records the page visit. - It sends no purchase event. Sweescape does not send any “Purchase”, “AddToCart” or conversion event to your tools. Sales therefore do not flow into Meta or Google automatically.
- It only covers the ticketing page, purchase window included. The confirmation page shown after payment does not load these scripts.
To follow your sales, visits and conversions, use SweeAnalytics, which counts them without any script. See Sales and traffic and Conversions.
Add a tracking code
Section titled “Add a tracking code”-
Copy the code provided by your tool: the Google Tag Manager container, the Meta pixel base code or the GA4 Google tag (gtag.js). Take the complete code,
<script>tags included. -
In Sweescape, open the event, Ticket tab, then Open Page Builder.
-
Click outside any block: the right-hand panel shows Page. Open the Advanced tab.
-
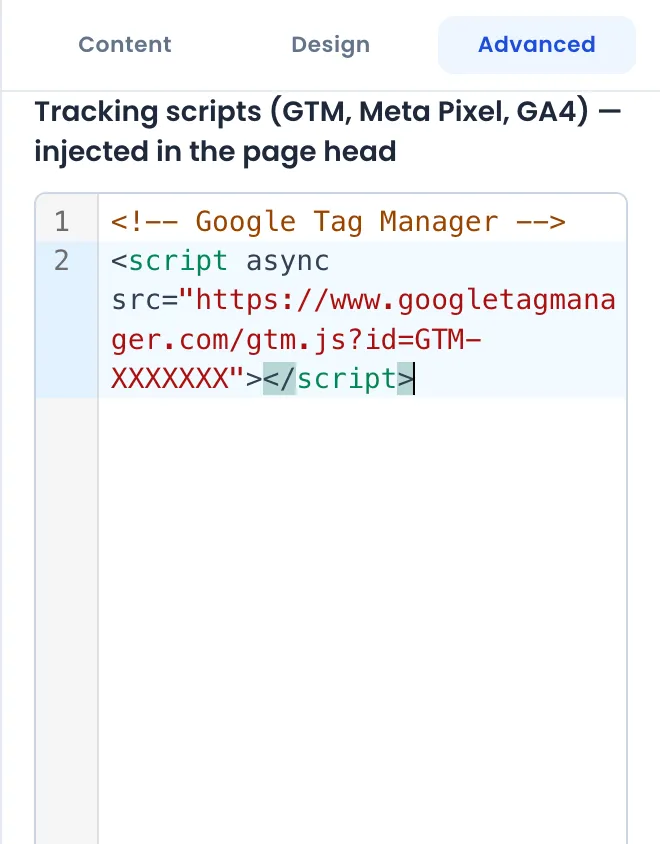
Paste the code into the Tracking scripts (GTM, Meta Pixel, GA4) field. You can paste several codes one below the other.
-
Close the editor, then click Publish (or Save if the page is a draft).
For Google Tag Manager, only the part meant for the <head> is useful. The <noscript> part, meant for the <body>, serves no purpose here: scripts only load after a click on the cookie banner, which requires JavaScript to be on.
The cookie banner
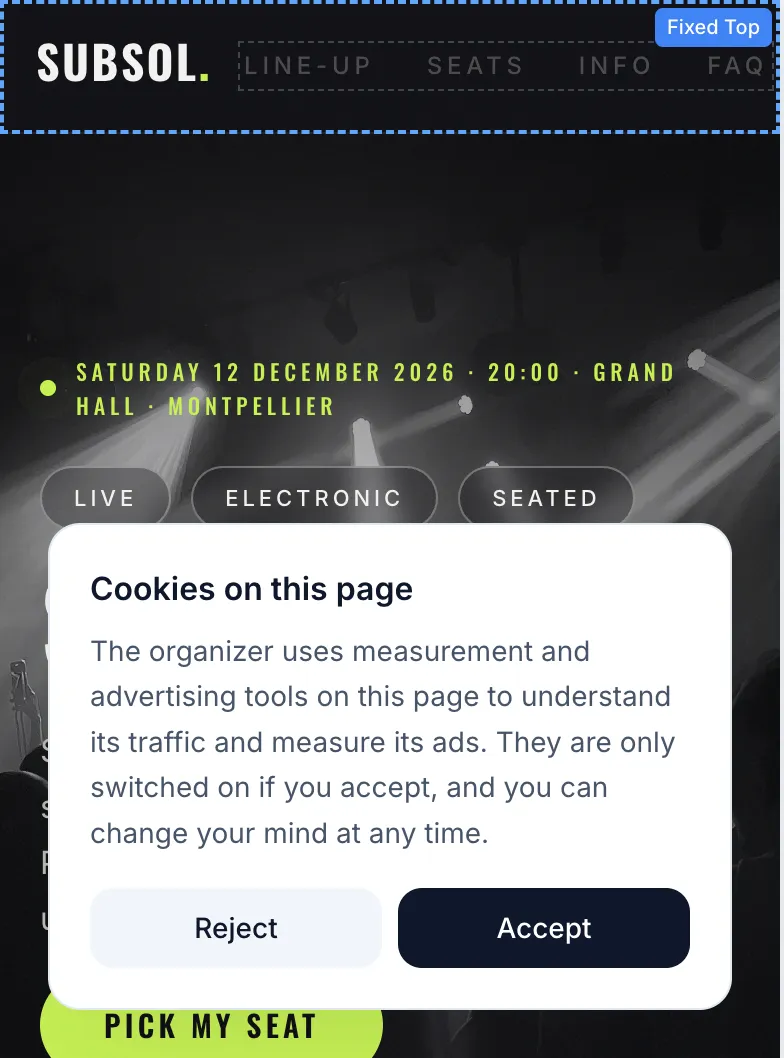
Section titled “The cookie banner”As soon as the Tracking scripts field contains code, a banner appears for every new visitor, at the bottom left of the page (at the bottom of the screen on mobile). It is titled “Cookies on this page”, explains that the organiser uses measurement and advertising tools that are only switched on with their consent, and offers two buttons: Reject and Accept.
| Visitor’s choice | What happens |
|---|---|
| Accept | Your scripts are added to the page and run. |
| Reject | None of your scripts are loaded. |
| No answer | None of your scripts are loaded until they answer. |
- The choice is remembered in the visitor’s browser for about six months. If you change the content of the field, the question is asked again to every visitor.
- The visitor can change their mind: a small cookie icon stays at the bottom left of the page and reopens the banner. If they withdraw consent, the page reloads without your scripts.
- The banner language follows the visitor’s language (French, English or Spanish).
- In the editor, the banner appears as a preview so you can see its style, but your scripts do not run there.
You can set its colours in the Design tab of the Page panel, 🍪 Cookie banner (shown when tracking scripts are set) section: banner background, border, title and text, colours of the Accept and Reject buttons.
Check that the code works
Section titled “Check that the code works”-
Publish the page.
-
Open it in a private browsing window, to be treated as a new visitor.
-
Click Accept in the banner.
-
Check that your tool receives data: Google Tag Manager Preview mode, GA4 “Realtime” report, Meta’s test events tool or the Meta Pixel Helper extension.
If nothing comes through, check that you did click Accept, that the code was pasted in full and that the page was republished after the change.
See also: Colours, fonts and SEO and Publish and share the page.