
Tickets in Apple Wallet and Google Wallet
On top of the PDF, each attendee can save their ticket in the Wallet app on their iPhone or in Google Wallet on Android. The card carries the same QR code as the PDF: SweeScan reads it the same way at the door.
How the attendee adds their card
Section titled “How the attendee adds their card”The Add to Apple Wallet and Add to Google Wallet buttons appear in two places:
- In the invitation email, if you added the Add to wallet buttons block to it (see Customize the invitation email). Without this block, the email does not offer the wallet.
- On the attendee’s invitation page, always, under “Keep your ticket on your phone”. This is the page of the link sent by SMS.
On iPhone, the Apple button downloads the card and offers to add it to Wallet. The Google button opens the Google Wallet save page. On the invitation page, the buttons are in French if the attendee’s browser is in French, and in English otherwise.
The card is built at the moment of the click, with the design and the attendee’s details at that time. An Apple Wallet card that has already been added is no longer updated: if you change the date or venue afterwards, the attendee has to add it again from their email or invitation page.
What the card shows
Section titled “What the card shows”Apple Wallet: the date, the event name, the attendee’s name, the ticket name, the date and time, the venue and the QR code. On the back: the address and the statement “Ce billet est personnel et incessible. Présentation obligatoire à l’entrée.” (this ticket is personal and non-transferable, to be shown at the entrance). The labels and dates of the Apple card are always in French, in Paris time.
Google Wallet: the organizer’s name, the event name, the venue, the dates, the attendee’s name, the ticket type, the QR code and the banner.
The attendee’s name is taken from their first name and last name fields. For an imported event, name your columns “firstname” and “lastname” (or “Prénom” and “Nom”) so it appears on the card. Without these details, the card shows no name.
Customize the cards
Section titled “Customize the cards”By default, the cards use the Sweescape design: blue background, white text, the Sweescape star as logo and the name “Sweescape” as issuer.
-
Open your event, Invitation tab, Wallet cards card. It shows Sweescape design or Your own design and a preview of both cards.
-
Click Customize your wallet cards.
-
Choose the Background color and the Text color, in hexadecimal format such as #1E3A8A.
-
In Logo, click Choose an image: a square PNG with a transparent background, at least 200x200px.
-
In Banner, choose a wide image with a 3:1 ratio, at least 1125x375px. Without a banner, the event image is used.
-
Check the Apple Wallet and Google Wallet preview on the right, which updates live with sample data.
-
Click Save. The message “Wallet cards saved.” confirms it.
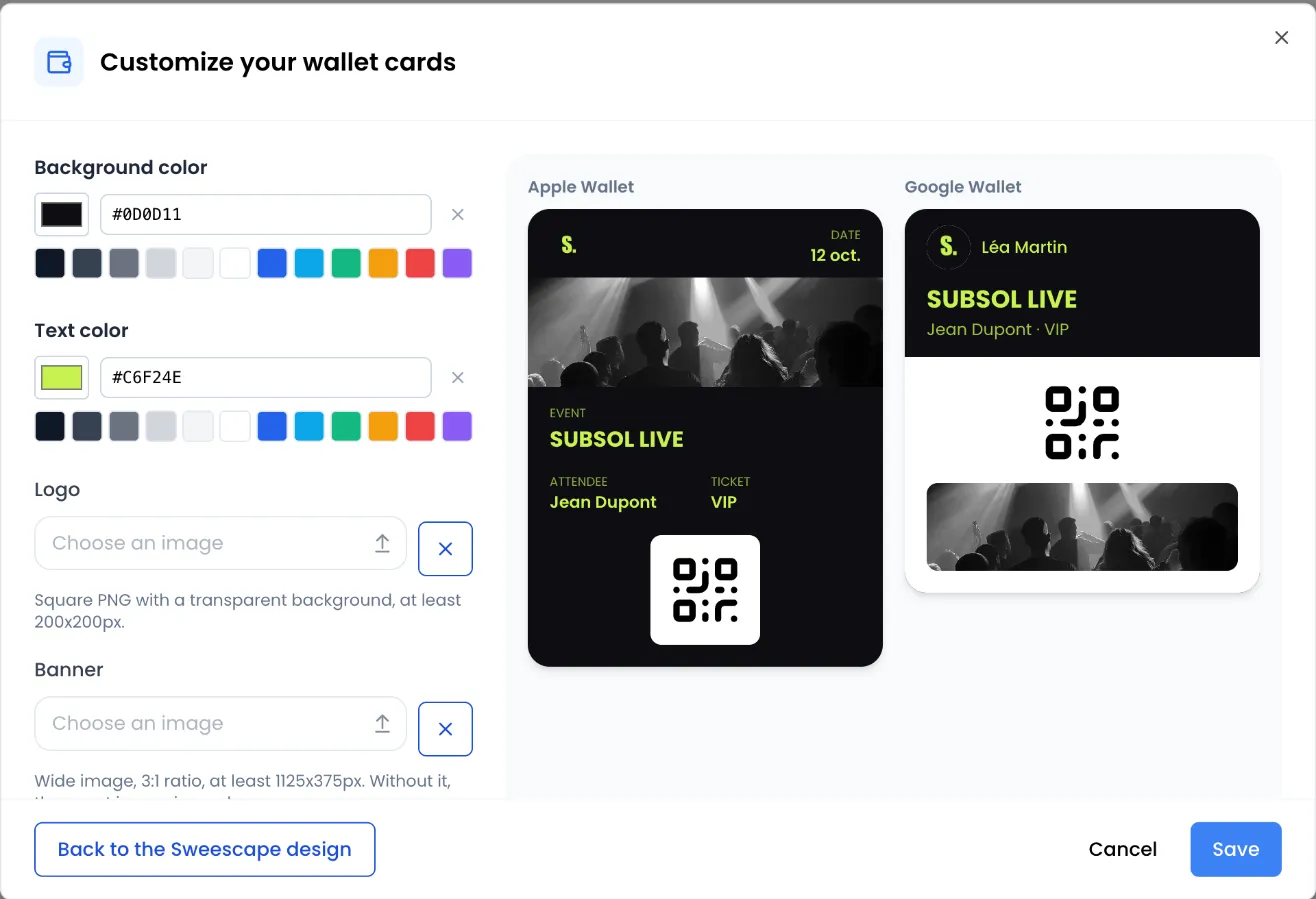
Images must be JPEG, PNG, WebP or GIF and weigh less than 2 MB each. The cross next to an image removes it.
With your own design, the name “Sweescape” disappears from the cards. The name shown as issuer becomes the first and last name of the account that owns the event.
To go back to the default design, open the window and click Back to the Sweescape design: your colours and images are deleted, and the message “Wallet cards reset to the default design.” appears.
| Message | Cause |
|---|---|
| “Each image must be lighter than 2 MB.” | The logo or the banner is larger than 2 MB. |
| “The logo must be a JPEG, PNG, WebP or GIF image.” | The logo file is not an accepted image. |
| “The banner must be a JPEG, PNG, WebP or GIF image.” | The banner file is not an accepted image. |
| “Colors must be hexadecimal, such as #1E3A8A.” | A colour is not in #RRGGBB format. |