
Send from your own domain
A sending domain lets your emails leave from your own address, for example [email protected], instead of a Sweescape address. Your attendees recognise the sender, and your messages are more likely to land in the inbox.
What the sending domain is for
Section titled “What the sending domain is for”- Email campaigns: a verified sending domain is required. Without it, the content window of an email campaign only shows the Add a domain in settings link.
- Automations and invitations: it is optional. Without it, these emails leave from a Sweescape address, under the Sweescape name. With it, you can tick Use custom sender and choose your address.
Plans and number of domains
Section titled “Plans and number of domains”The sending domain is reserved for the Advanced and Agency plans. Without one of them, the card shows the Upgrade your plan button.
The number of domains follows the number of brands in your plan: one domain on the Advanced plan, five on the Agency plan. Beyond that, a One sending domain per brand window appears when you add one. Domains awaiting verification count towards this number. See Subscription.
Choose the domain to add
Section titled “Choose the domain to add”Add a subdomain rather than your main domain, for example marketing.subsol.fr rather than subsol.fr. The add window recommends it: one subdomain per use, notification.your-domain.com for invitations and automations, marketing.your-domain.com for campaigns. This way, a campaign reported as spam does not hurt the delivery of your tickets. On the Advanced plan, which includes a single domain, pick the one that matches your main use.
Add a domain
Section titled “Add a domain”-
Open your account menu at the top right, then Settings.
-
In the External connection card, find the Custom Mail Domains row and click Add.
-
In the Add your custom domain window, enter the Domain name, for example
marketing.subsol.fr, withouthttps://or@. -
Click Add the domain. The message Domain added successfully! appears, then the setup window opens with the DNS records to create.
Possible error messages:
- Invalid domain format. Please check and try again.: the name is not a complete domain, such as
marketing.subsol.fr. - This domain already exists in your account.: it is already in the list.
- An error occurred while creating the domain. Please retry later or contact support.: the creation failed. Try again later or contact support.
Create the DNS records
Section titled “Create the DNS records”The Setup marketing.subsol.fr window lists the records to add at the host of your domain name (where you bought it, or whoever manages your DNS).
It contains three tables:
- SPF & DKIM: two records that prove Sweescape is allowed to send for your domain.
- DMARC: one record that tells mailboxes what to do with an unauthenticated message.
- Tracking: one record that makes it possible to measure opens and clicks. Without it, your campaign statistics show no opens and no clicks.
Each row shows the record Type, its Name and its Value, with a button to copy each one. The Status column changes from Not Verified to Verified once the record is found.
-
Open your host’s DNS area in another tab.
-
For each row, create a record of the given type, then paste the name and value copied from Sweescape.
-
Come back to Sweescape and click Verify your domain setup. The message Checking your domain appears and the statuses refresh.
-
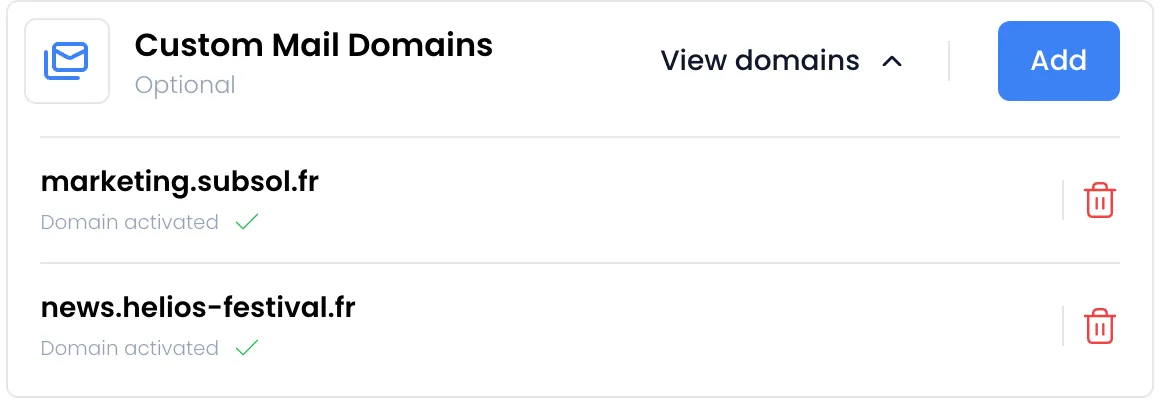
When the domain is verified, the message Your domain is verified! appears and the window closes. In the list of the Custom Mail Domains row (View domains button), the domain shows Domain activated with a green tick. Open and click tracking is switched on at that moment.
If the domain is not verified yet
Section titled “If the domain is not verified yet”A DNS change can take a while to become visible. If some rows stay Not Verified, wait and then run the check again:
-
In the Custom Mail Domains row, click View domains.
-
An unverified domain shows its identifier and a red cross. Click Setup your domain.
-
Check that each record matches exactly what is displayed, then click Verify your domain setup.
As long as the domain is not verified, a campaign or an automation that uses an address on this domain cannot be saved: the message Domain is not verified! Please verify it before sending. appears.
Use the domain
Section titled “Use the domain”- Email campaign: in the content window, enter the Sender email (an address on your domain) and the Sender name, for example “SUBSOL”. See Create and send a campaign.
- Automation: tick Use custom sender in the email content. See Schedule automatic messages.
- Invitation: also tick Use custom sender in the invitation email settings. See Send the invitations.
Delete a domain
Section titled “Delete a domain”In the list of domains, click the domain’s bin and confirm. The message Domain deleted successfully! appears. Before deleting a domain, check that no scheduled campaign or automation still uses it as the sender.