
Your ticketing page
The ticketing page is the web page where your buyers discover your event and buy their tickets. It carries your name and your colours, you design it yourself in a visual editor, and you can publish it on your own domain.
What you get
Section titled “What you get”- A page you design freely: headings, text, photos, video, map, FAQ, countdown… You assemble blocks without writing code. See Ticketing page blocks.
- Built-in sales: a button on the page opens the purchase window, where the buyer picks tickets, fills in their details and pays. See The checkout.
- Your identity: colour palette, fonts, style of the purchase window. See Colours, fonts and SEO.
- Your address: the page is served on a Sweescape address, or on your own subdomain (for example
tickets.subsol.fr). See Put your ticketing on your own domain. - Several languages: one version of the page per language, linked by a flag picker. See Offer the page in several languages.
- Good SEO: the page is delivered fully rendered to search engines and social networks. Indexing by Google is off by default, and you turn it on whenever you want.
Before you start
Section titled “Before you start”To build the page, you need:
- An active subscription. Without an active subscription, the page card is locked: it shows Unlock White Label and an Upgrade Plan button. See Your subscription.
- An event with ticketing. The Ticket tab, where the page lives, only exists for events created with the Event with ticketing option. An event created by importing a participant list has no ticketing page. See Create an event.
- A connected, active Stripe account with its invoicing company. You pick it when you create the event. See Connect Stripe.
To publish it, you also need:
- At least one ticket. See Create your tickets.
- The event invitation: the invitation design (the PDF ticket the buyer receives) and the invitation email, in the Invitation tab. This is what the buyer receives after paying. See Send invitations.
Where to find the page
Section titled “Where to find the page”-
Open your event, then the Ticket tab.
-
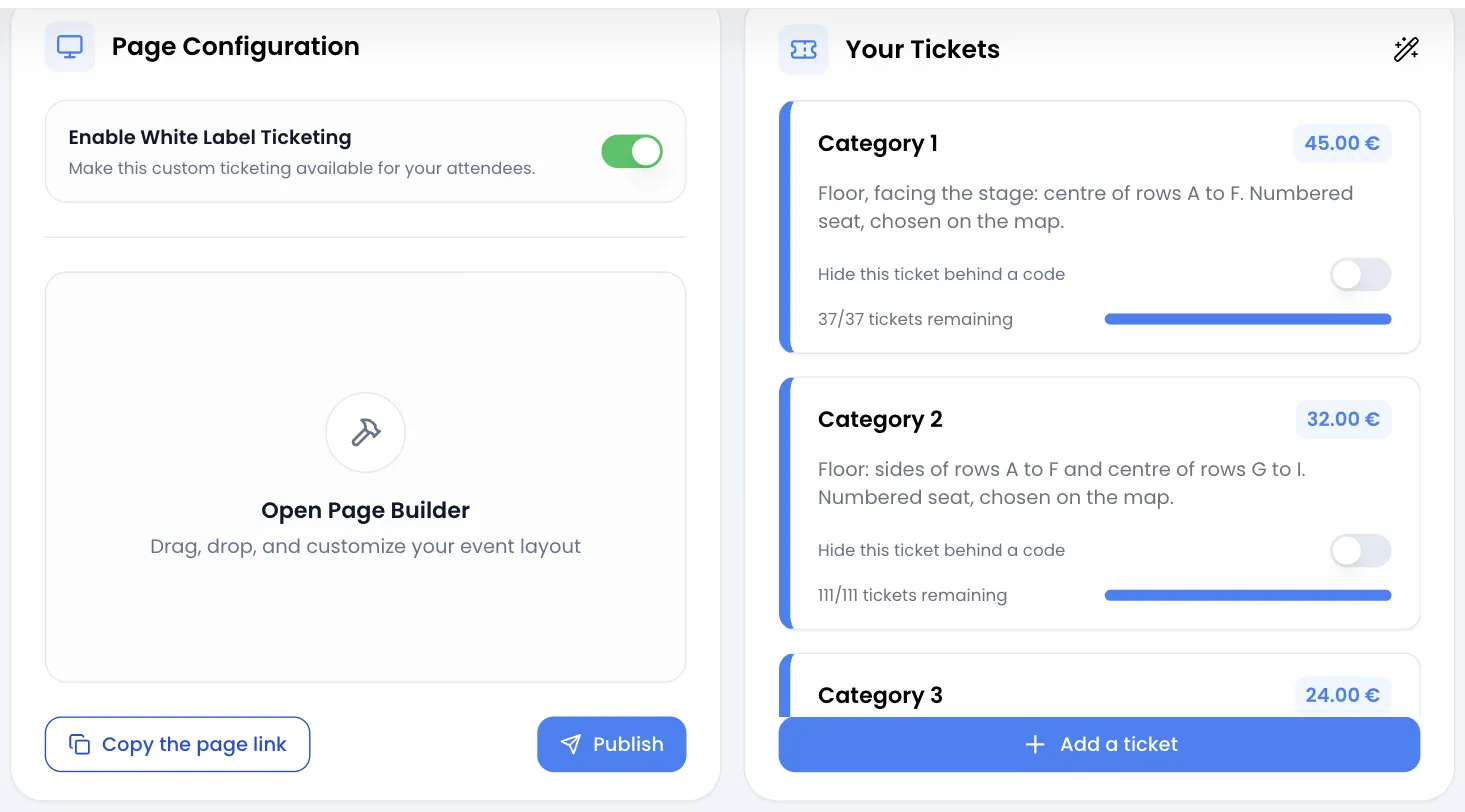
The Page Configuration card, on the left, holds everything about the page: the go-live switch, access to the editor, the page link and the save button.
-
On the right, the Your Tickets card lists your tickets. Further down, the Your own domain card lets you connect your domain, followed by your codes.
From draft to live page
Section titled “From draft to live page”The starter page. The first time you open the editor, Sweescape offers a page already filled with your event’s information: its name, its image, a two-column introduction with a Book your tickets button, a description to complete, the venue with a map and practical information (parking, public transport, accommodation), then links to your social networks. Keep what you like and replace the rest.
Saving is not automatic. Closing the editor is not enough: your changes are only saved when you click Save or Publish, at the bottom of the Page Configuration card.
Two possible states, controlled by the Enable White Label Ticketing switch:
| State | Switch | Button shown | What visitors see |
|---|---|---|---|
| Draft | off | Save | a “Ticketing Unavailable” page |
| Live | on | Publish | your page, with sales open |
Once live, every click on Publish updates the published page immediately. There is no separate draft of a page that is already published: check your changes with the editor’s Preview button before publishing.