
View and manage your attendees
The Participants tab is the one that opens first when you enter an event. It lists everyone expected: the buyers from your ticketing page, the people added by hand and those imported from a file.
Where attendees come from
Section titled “Where attendees come from”- Buyers. Each ticket bought on your ticketing page creates an attendee: an order of 3 tickets gives 3 attendees. They automatically receive their invitation by email if it is set up.
- Manual additions. You add a person yourself, for example a guest or an artist. See Add attendees.
- Imports. In an event created from a list, you can import more files. See Add attendees.
The number shown next to the Participants tab name counts all the event’s attendees. It is calculated when the event opens: reload the page to update it after adding or deleting someone.
The attendee table
Section titled “The attendee table”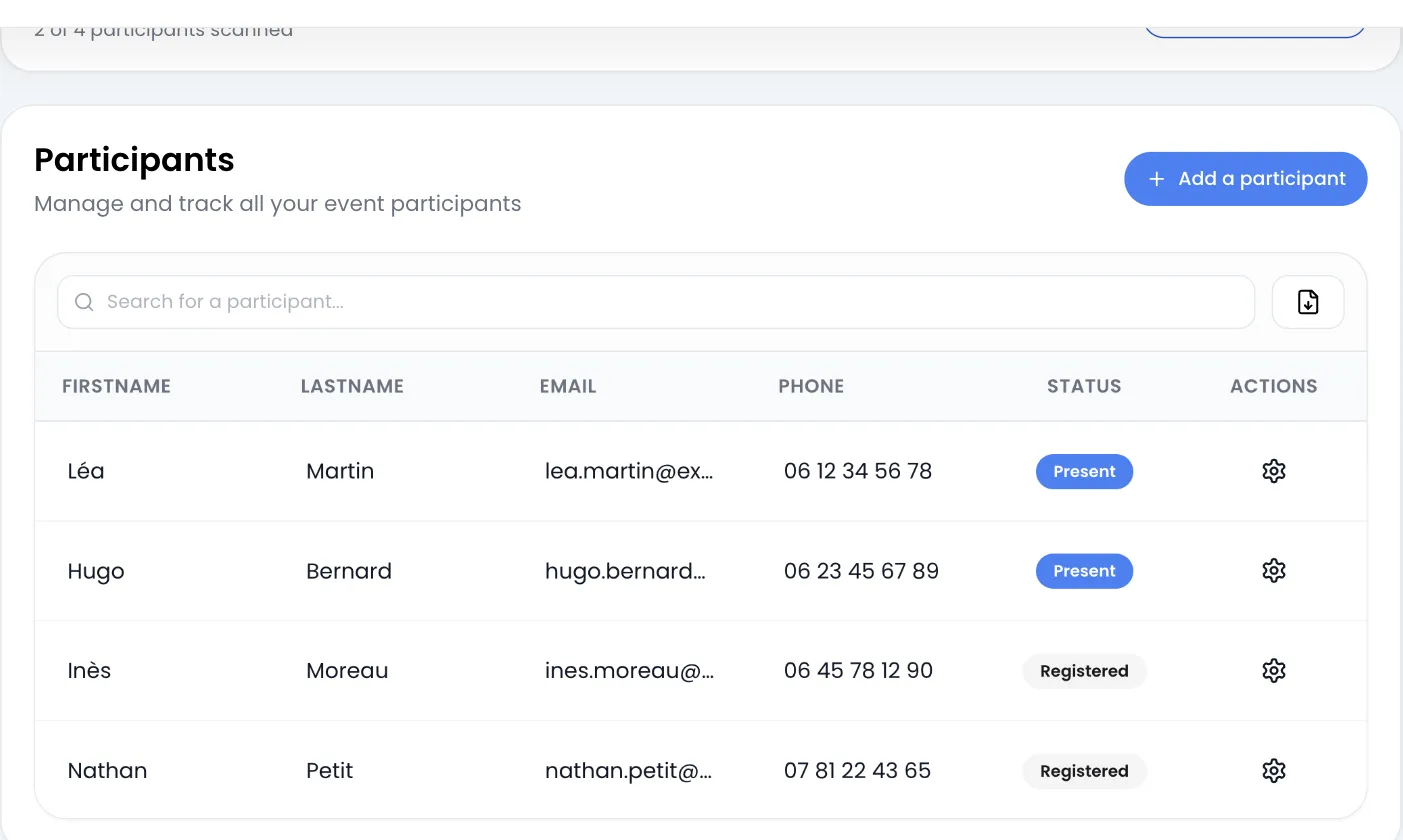
The columns depend on the type of event:
- Event with ticketing: Firstname, Lastname, Email, then your custom fields in capitals, then the fields added by your extensions (a seat number, for example).
- Event created by import: the columns of your file, in capitals, in their original order.
Two columns always end the table:
- Status: Registered as long as the person has not come in, Present once their ticket is scanned or their entry is checked in. Scans made with SweeScan appear after reloading the page. See Check attendees in.
- Actions: the gear icon opens the row menu.
Dates are written out in full and checkboxes show as “Yes” or “No”. If a text is cut off, hover over the cell to read it in full. With many columns, scroll the table horizontally.
All attendees are loaded into the table: there are no pages, just scroll the list. There is no sorting and no filter by ticket either.
Search for an attendee
Section titled “Search for an attendee”Type in the “Search for a participant…” field above the table. The search covers all the attendee’s fields (first name, last name, email and custom fields), ignores upper and lower case, and accepts part of a word: “mart” finds Léa Martin.
If nothing matches, the table shows “No results found for this search!”.
The row menu
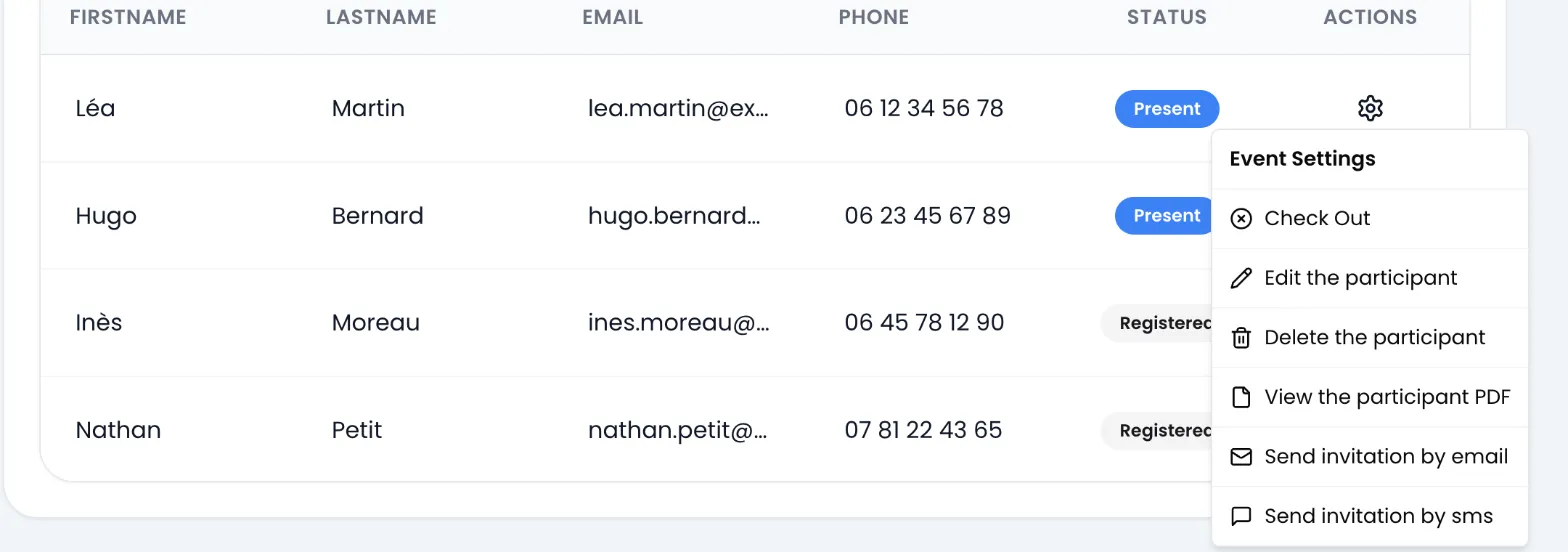
Section titled “The row menu”Click the gear in the Actions column. The menu, titled Event Settings, offers:
| Action | Effect |
|---|---|
| Check In or Check Out | Marks the person as present, or cancels their check-in. See Check attendees in. |
| Edit the participant | Opens the edit window (see below). |
| Delete the participant | Deletes the row after confirmation (see below). |
| View the participant PDF | Opens, in a new tab, this person’s ticket page, the one they receive by email: “Your Invitation is Ready!”, with View Invitation and Download PDF. |
| Send invitation by email | Sends the invitation to this attendee only, for example if they did not receive it. |
| Send invitation by sms | Sends the invitation by SMS. Each sending uses one SMS credit of the event owner. |
The message “Your invitation has been successfully sent!” confirms the sending. The invitation and the PDF ticket must be set up in the Invitation tab. See Send invitations.
| Message when sending | Cause |
|---|---|
| Invitation does not exist! | No invitation email (or SMS) is set up for this event. |
| Badge does not exist! | The PDF ticket has not been created yet. |
| Ticket does not exist! | In an event with ticketing, this attendee has no ticket. |
| Insufficient SMS credits. Please add more credits to the account that owns this event. | The event owner has no SMS credits left. |
Edit an attendee
Section titled “Edit an attendee”-
In the row menu, click Edit the participant.
-
In the Update participant window, correct the fields. Fields marked with an asterisk are required; in an event with ticketing, Firstname, Lastname and Email always are.
-
Click Update.
The message “Participant successfully updated!” appears. If a required field is empty or incorrectly filled in, you get “Participant data is invalid!”.
The attendee’s ticket cannot be changed from this window. Changing the email does not resend the invitation: use Send invitation by email afterwards.
Delete an attendee
Section titled “Delete an attendee”-
In the row menu, click Delete the participant.
-
In the Are you sure? window, click Delete now.
The row disappears from the table, along with any recorded check-in. SweeScan no longer recognizes the QR code of their ticket.