
Send invitations
The invitation is the message that delivers each attendee’s ticket: a PDF in their name with their personal QR code, which the SweeScan app reads at the door. You set it up once per event in the Invitation tab. It then goes out on its own after every purchase, or whenever you send it yourself.
What the attendee receives
Section titled “What the attendee receives”- By email: your message, with the PDF ticket attached. If you add the Add to wallet buttons block, the email also offers to save the ticket in Apple Wallet or Google Wallet.
- By SMS: your short message, followed by a link to their invitation page, where they can open and download their PDF.
Each ticket is one attendee and one QR code. An order for three tickets creates three attendees: three invitations go out, each with its own QR code, to the address recorded for each ticket (usually the buyer’s).
What you need to prepare
Section titled “What you need to prepare”Nothing is sent until these are ready:
- The PDF ticket: a background uploaded in the Invitation design card, then the attendee details and QR code placed and saved with Update. See Design the PDF ticket.
- The channel settings, saved with Save: subject and message for email (Customize the invitation email), phone column and message for SMS (Send the invitation by SMS).
- For SMS only: SMS credits on the account that owns the event.
The Invitation tab
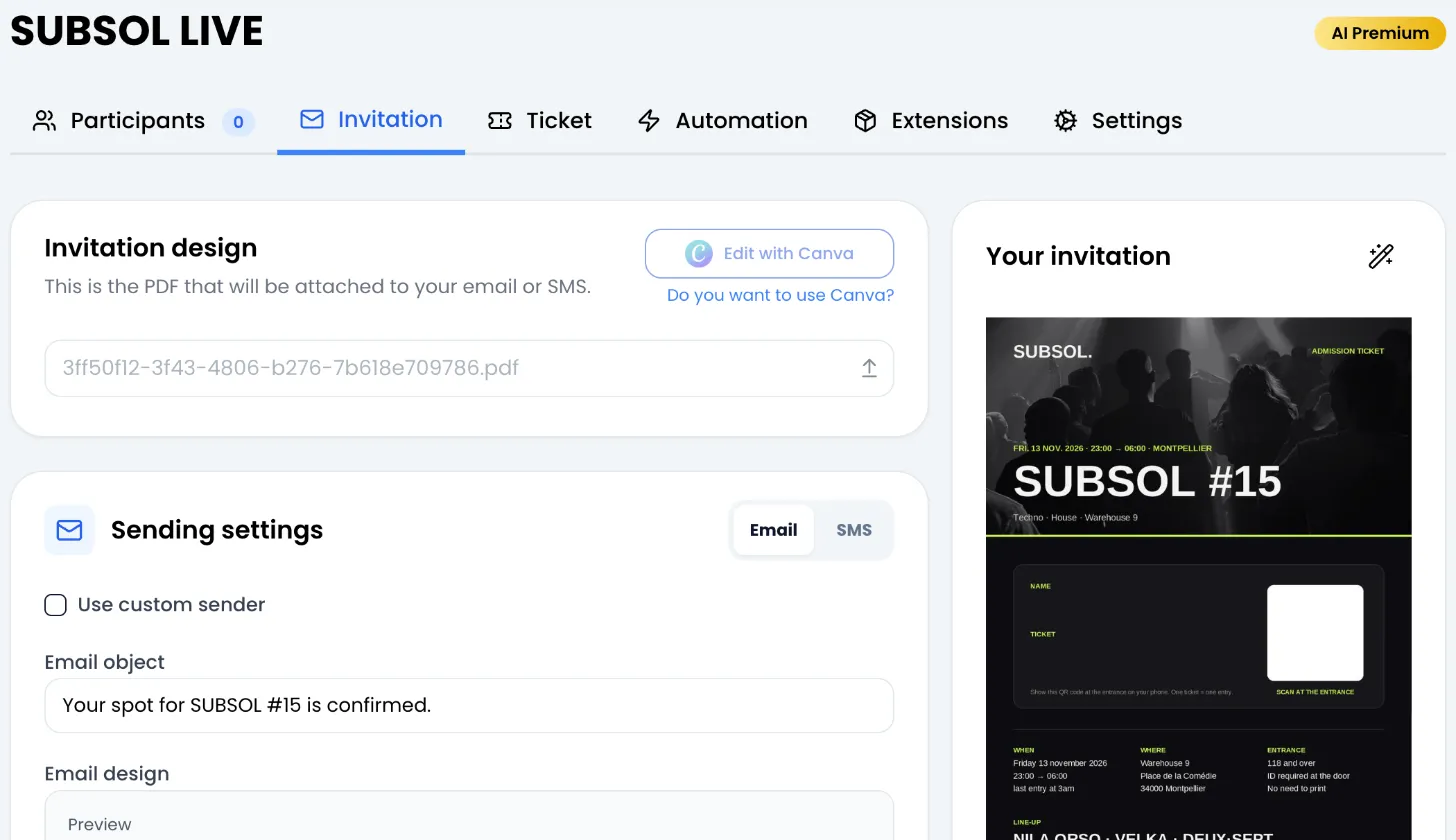
Section titled “The Invitation tab”Open your event, then the Invitation tab. It contains:
- Invitation design: the PDF background of your ticket, and the Edit with Canva button.
- Sending settings: the email and SMS settings, with an Email / SMS switch in the top right corner.
- Wallet cards: the design of the Apple Wallet and Google Wallet cards.
- Your invitation, on the right: a preview of the background and the Customize your invitation button to place the attendee details.
Automatic sending after a purchase
Section titled “Automatic sending after a purchase”As soon as an order is confirmed on your ticketing page (payment accepted, or free order), Sweescape creates one attendee per ticket and sends them the invitation by email. There is nothing to switch on: the PDF ticket and the email invitation just need to be saved.
Automatic sending only covers email. SMS is always sent manually. Attendees you add yourself or import do not receive anything automatically either: send them the invitation as explained below.
Send to all your attendees
Section titled “Send to all your attendees”-
In the Invitation tab, Sending settings card, choose Email or SMS.
-
Check your settings and click Save. The Send button only appears once this channel’s settings are saved.
-
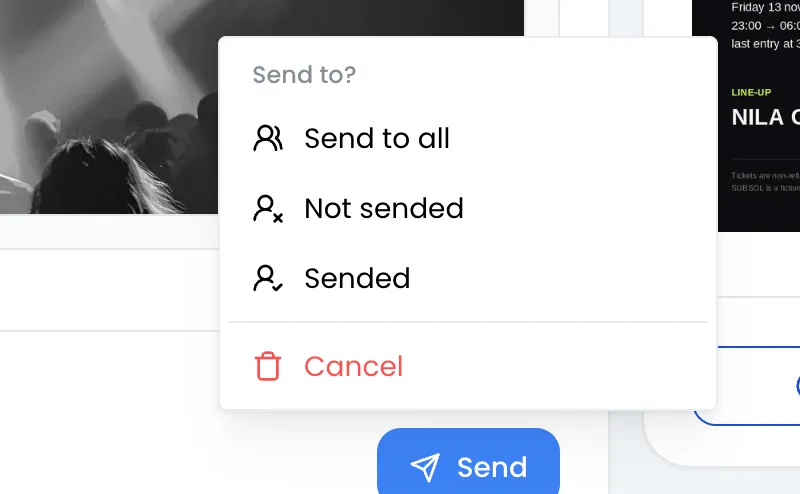
Click Send, then choose who to send to in the Send to? menu:
- Send to all: every attendee of the event, including those who already received the invitation.
- Not sended: only those who have not received it yet on this channel.
- Sended: only those who already received it on this channel, for example to send a corrected version.
-
The message “Your invitations are being sent and are in the queue!” confirms the request. While sending, the tab is covered by a white overlay with a loading spinner and “Invitations are being processed in the queue!”. It unlocks on its own when sending is complete.
Email and SMS are tracked separately: an attendee who received the email still counts as Not sended for SMS.
Send or resend the invitation to one attendee
Section titled “Send or resend the invitation to one attendee”-
Open the event’s Participants tab.
-
On the attendee’s row, click the gear icon.
-
Choose Send invitation by email or Send invitation by sms. The message “Your invitation has been successfully sent!” confirms it.
If the attendee has changed their email address or phone number, fix it first with Edit the participant in the same menu. Resending does not change the QR code: the previous PDF remains valid.
View an attendee’s invitation
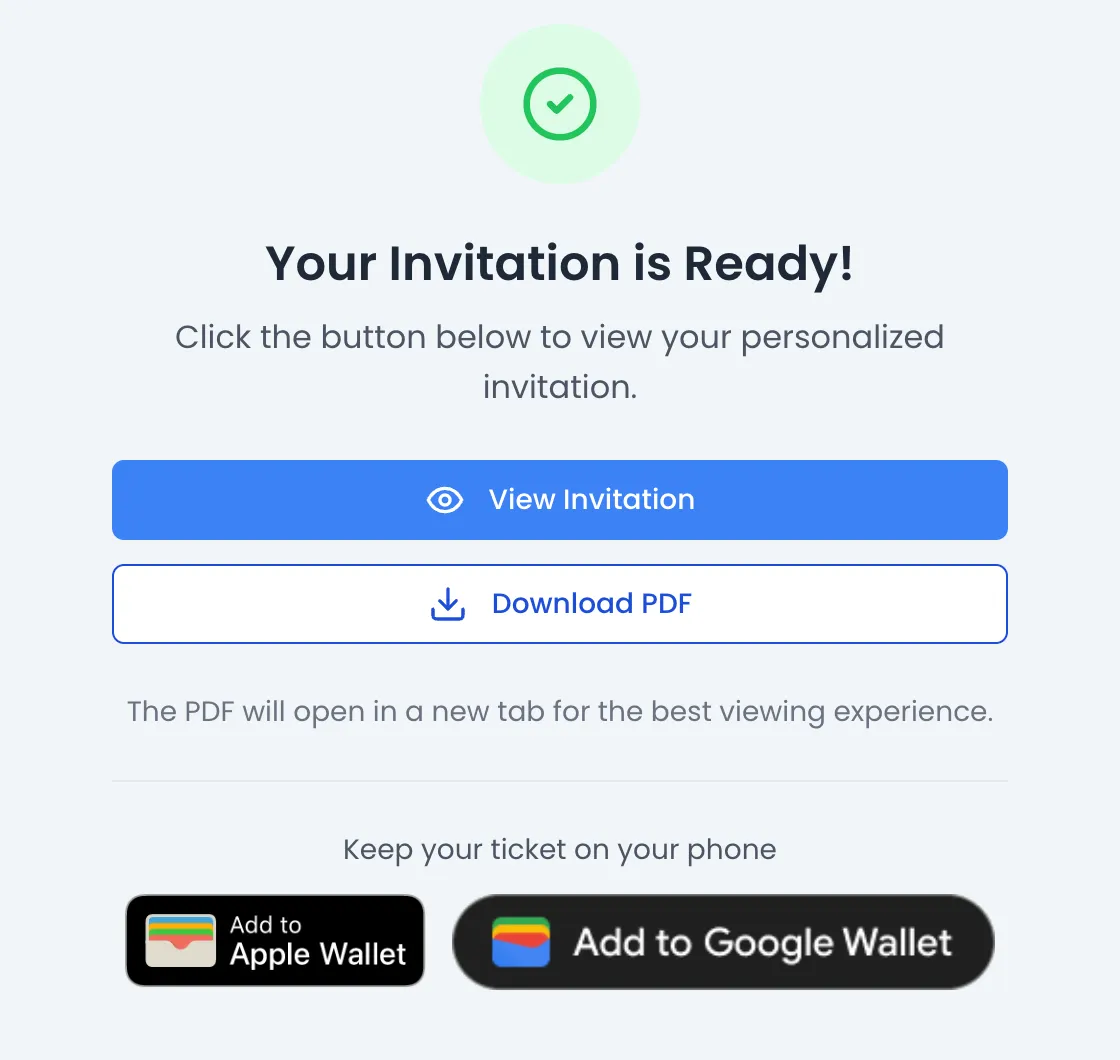
Section titled “View an attendee’s invitation”In the Participants tab, the gear icon on a row offers View the participant PDF. This opens that attendee’s invitation page in a new tab: it is the same page as the link sent by SMS.
The page shows “Your Invitation is Ready!”, a View Invitation button, a Download PDF button, and the Apple Wallet and Google Wallet buttons under “Keep your ticket on your phone”. It builds the PDF every time it is opened, with the current ticket design.
Common error messages
Section titled “Common error messages”| Message | Cause | What to do |
|---|---|---|
| “Badge does not exist, please create a badge first!” | The PDF background is not uploaded, or the ticket was never saved with Update. | Follow Design the PDF ticket. |
| “Invitation does not exist, please create an invitation first!” | This channel’s settings have not been saved. | Fill in the Sending settings card and click Save. |
| “Insufficient SMS credits. Please add more credits to the account that owns this event” | The credit balance is lower than the number of recipients. | Buy SMS credits. |
| “An error occurred, please retry later!” | General error, for example a custom sender whose domain is no longer verified. | Check the sender in the email settings, then try again. |