
Choose the information asked of attendees
By default, Sweescape asks each buyer for their first name, last name and email. Custom fields let you ask for something else: dietary requirements, a t-shirt size, a company name, a date of birth. Each field becomes a column of your attendee list.
Custom fields apply to events with ticketing. In an event created by import, the fields are the columns of your file and cannot be changed.
Where the fields appear
Section titled “Where the fields appear”- In the purchase form of your ticketing page, with the field name as its label. See The checkout.
- In the attendee table, as a column whose title is in capitals.
- In the windows used to add and edit an attendee.
- In the export of the list. See Export the attendee list.
- In the Invitation tab: each field can be inserted in the invitation email and placed on the PDF ticket. See Design the invitation.
The three basic fields
Section titled “The three basic fields”Firstname, Lastname and Email are always asked. Their name and type cannot be changed: you only choose how often they are asked.
-
In the Field Configuration card, click Firstname, Lastname or Email.
-
In Asked, choose:
- Once per order (the default; the field shows a padlock): the buyer fills in the field once, and all the tickets of their order get the same value.
- For each ticket (the field shows Per ticket): the buyer fills in the field for each ticket of their order.
-
Click Save the fields.
Add a custom field
Section titled “Add a custom field”-
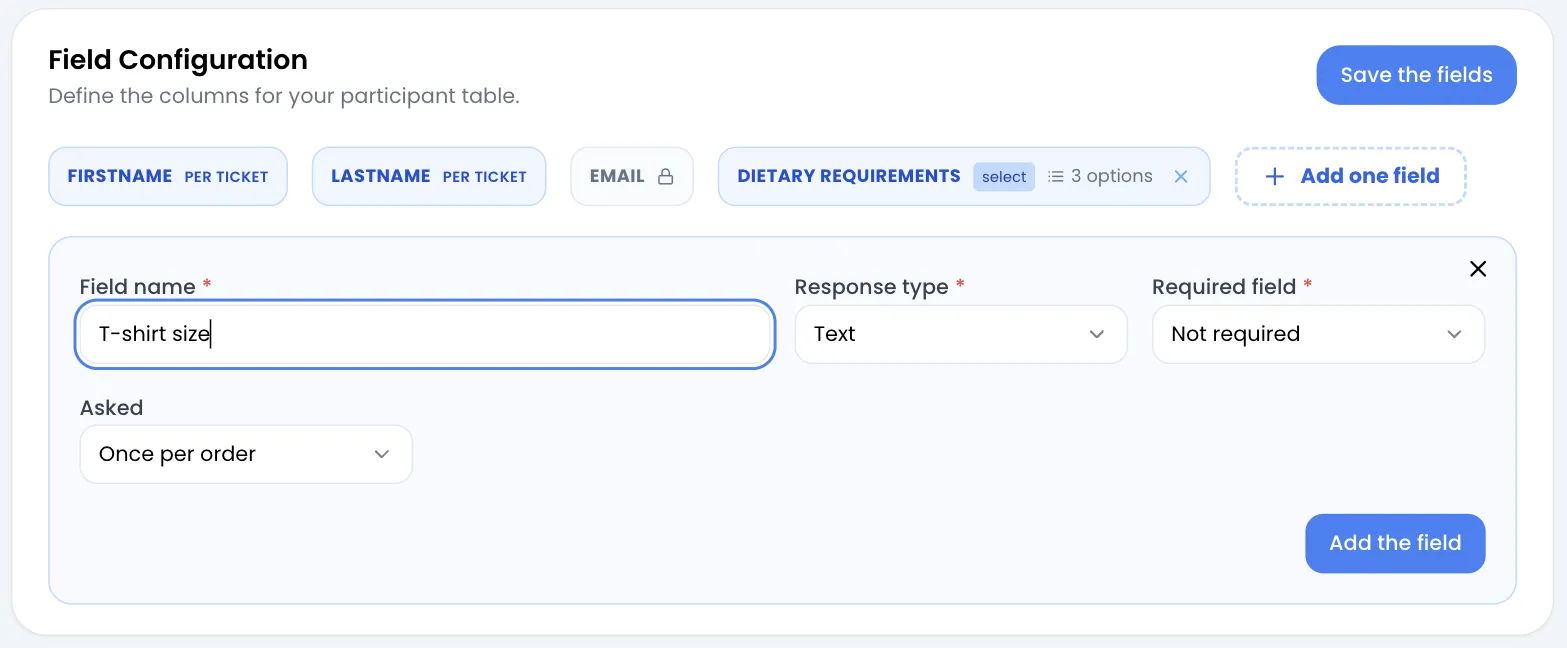
Open the event, Participants tab. In the Field Configuration card, click Add one field.
-
Fill in the form:
- Field name: the label your buyers will see, for example “Dietary requirements”. It is required.
- Response type: the kind of answer expected (see the table below).
- Required field: Required forces the buyer to answer, Not required makes the answer optional.
- Asked: Once per order or For each ticket, as for the basic fields.
-
For a list of choices, add the possible answers in Menu options: type an option, then click Add or press Enter. At least one option is needed. The cross on an option removes it.
-
Click Add the field. The field appears in the card, next to the basic fields.
-
Click Save the fields at the top of the card.
The message “Participant column created successfully!” confirms the save.
Response types
Section titled “Response types”| Type | What the buyer enters | Example |
|---|---|---|
| Text | Free text | Company, nickname, message |
| Number | A number | Age, number of guests |
| Date | A date, picked in a calendar | Date of birth |
| Checkbox | A yes or no answer | Agrees to be photographed |
| Dropdown (Select) | One of your options | Dietary requirements: None, Vegetarian, Vegan |
Reorder or delete fields
Section titled “Reorder or delete fields”- Change the order: drag a custom field onto another one’s place. The order you choose is the order of the table columns.
- Delete: click the cross on the field.
- Edit: a field cannot be edited. Delete it, then add it again with the right settings.
In every case, click Save the fields afterwards.
Each field shows its name, its type (text, number, date, boolean or select), the word “Required” if it is mandatory, and the number of options for a list. Hover over that number to see the options.
Fields added by an extension
Section titled “Fields added by an extension”Some extensions add their own fields, such as a seat number for a seating plan. They show in the attendee table and in the add and edit windows, but not in the Field Configuration card nor in the purchase form: the extension fills them in. See Extensions.
Error messages
Section titled “Error messages”| Message | Cause |
|---|---|
| You cannot edit columns when event has participants! | The event already has at least one attendee. The fields are locked. |
| Invalid data format, please retry with a valid data format, fill all the fields! | A field is incomplete, for example a list without options. |
| Field name is required | The field name is empty. |
| At least one option is required for a select field | A list of choices needs at least one option. |