
Create and send a campaign
A campaign is a bulk message, by email or SMS, to every contact of an audience or of a segment of that audience. Use it to announce a night, open ticket sales or win back past customers.
Before you start
Section titled “Before you start”- An active paid plan. Without one, the + button opens a window inviting you to pick a plan.
- An audience whose email column is declared (for an email campaign) or phone column (for an SMS campaign). See Choose the email and phone columns.
- For an email campaign: a verified sending domain. Without it, you can create the campaign but not write its content.
- For an SMS campaign: SMS credits. You buy them from your account menu, SMS Credits.
The Campaigns page
Section titled “The Campaigns page”Open your account menu at the top right, then Campaigns. Each campaign appears as a card, newest first, with its name, its date and its status.
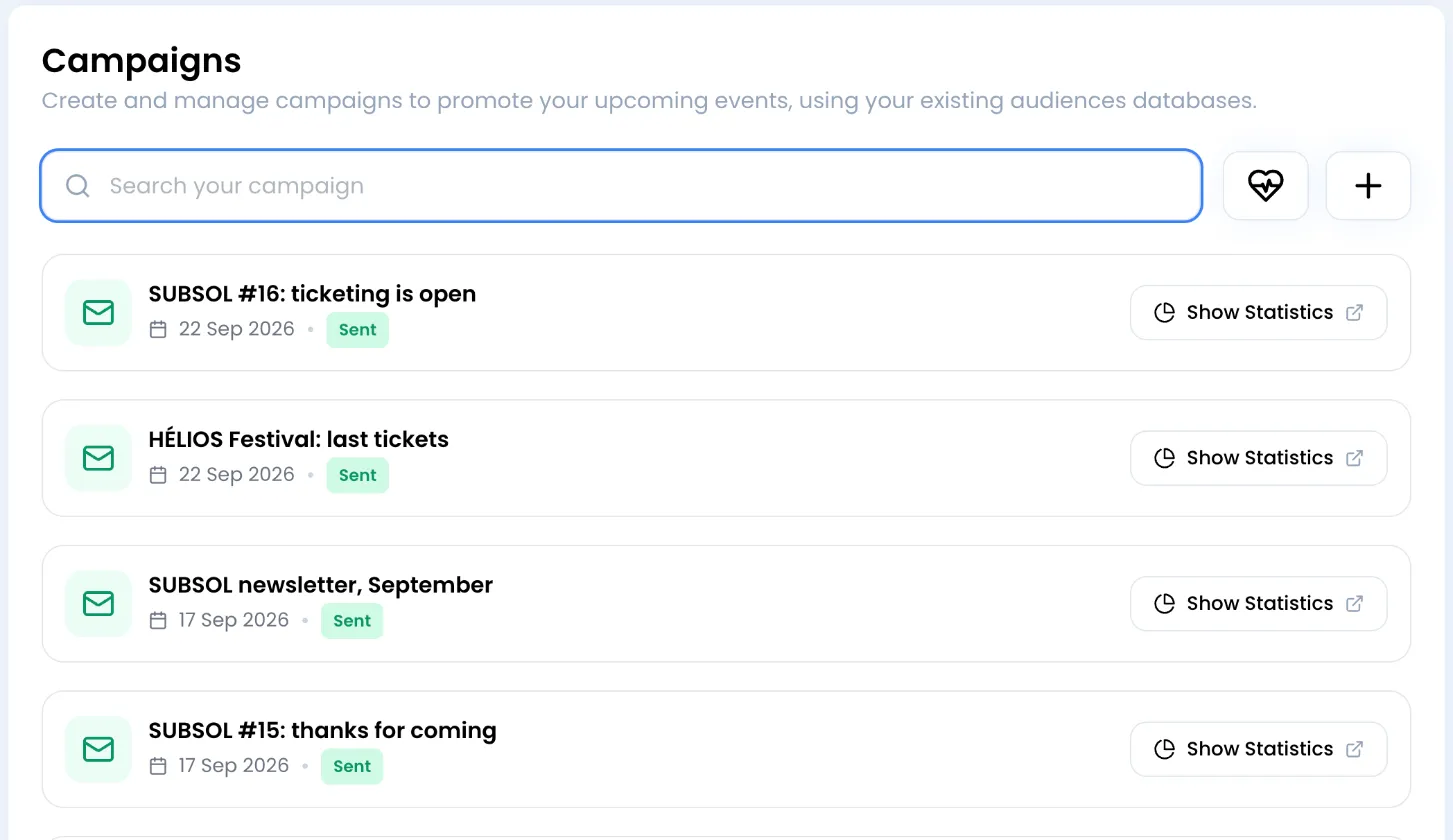
- The Search your campaign field filters the cards by name.
- The heart-shaped button opens the list of people you can no longer write to (see Deliverability and unsubscribes).
- The + button creates a campaign.
Create a campaign
Section titled “Create a campaign”-
Click the + button.
-
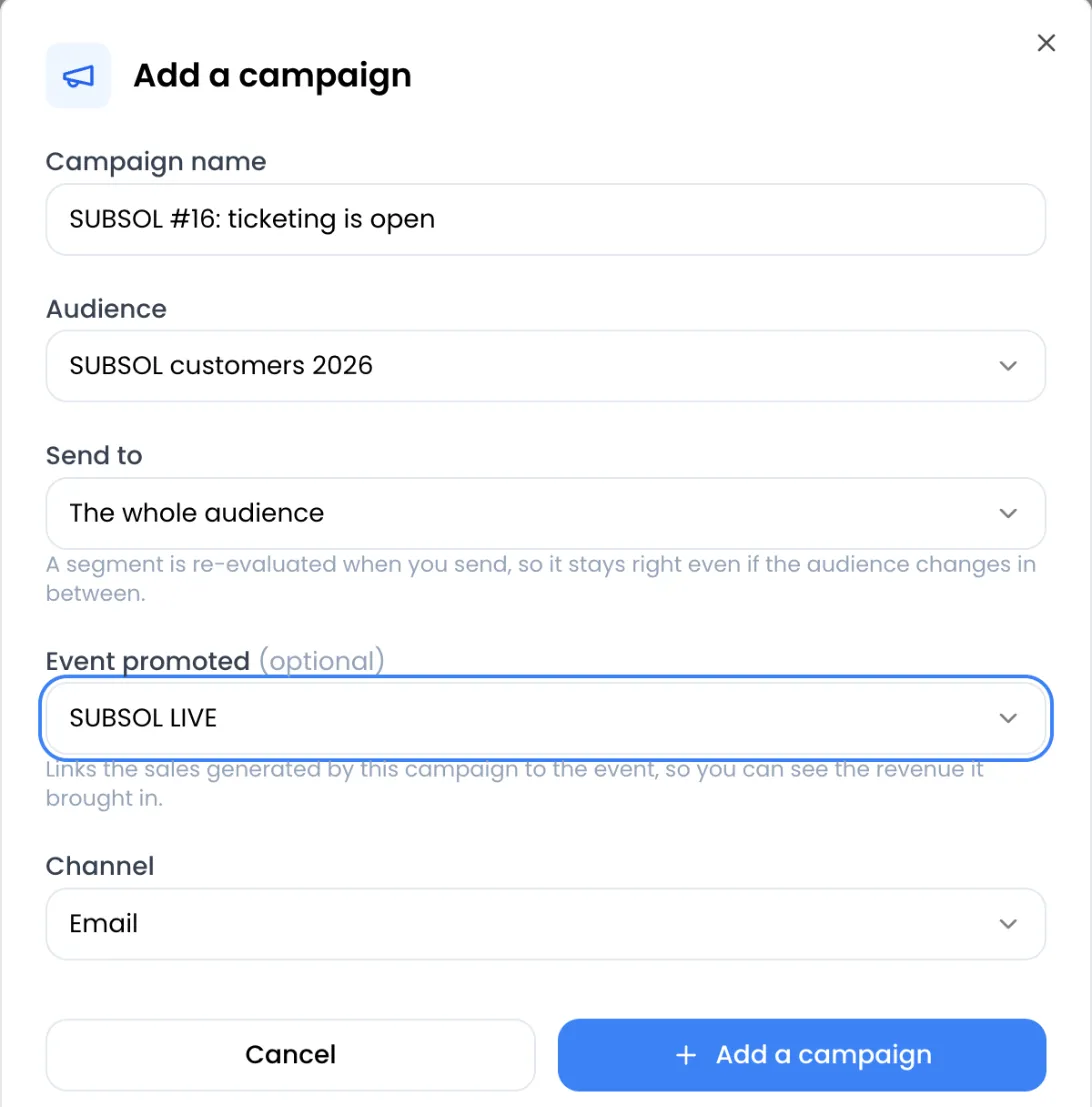
In the Add a campaign window, fill in the fields:
- Campaign name: a name to find it again, which your recipients do not see. For example “HÉLIOS ticket sales open”.
- Audience: the contact list to write to. The Create an audience link at the bottom of the list takes you to the audiences page.
- Send to: this field only appears if the audience has segments. Leave The whole audience or pick a segment; the number in brackets is its number of contacts.
- Event promoted (optional): the event the campaign promotes. It is shown with the campaign in SweeAnalytics.
- Channel: Email or SMS. It cannot be changed later.
-
Click Add a campaign. The message Campaign added successfully! appears and the content window opens straight away.
If the audience has no column for the chosen channel, an orange box says so, for example This audience has no email column set. Declare it in the audience settings before creating an email campaign., and the Add a campaign button stays greyed out. Click Open the audience settings to declare it.
Write an email campaign
Section titled “Write an email campaign”The Edit … content window (with the campaign name) opens after creation. Reopen it at any time with the Edit content button on the card.
-
Enter the Sender email, an address on your verified sending domain, for example
[email protected]. -
Enter the Sender name, the one your recipients will see in their inbox, for example “SUBSOL”.
-
Enter the Email object (the subject line), between 10 and 150 characters.
-
Under Email design, click Create your design. The editor opens full screen (see Design an email with the editor). When your email is ready, click Close builder.
-
A Preview of the email appears in the window. Click Save content. The message Campaign content updated successfully! confirms it is saved.
The Save content button stays greyed out until the email is designed and the subject has at least 10 characters. If the window only shows Want to use a custom sender? Add a domain in settings, your account has no sending domain yet: add one first.
Error messages when saving:
- Domain does not exist!: the sender address does not end with one of your sending domains.
- Domain is not verified! Please verify it before sending.: the domain is added but its DNS records are not validated yet.
- The email design is not valid!: reopen the editor, check the blocks, then close it again.
Write an SMS campaign
Section titled “Write an SMS campaign”For an SMS campaign, the content window shows a single field, Sms message.
-
Write your message. The Variables button inserts a column of the audience, for example the first name (see Personalize with variables).
-
Keep an eye on the counter at the top right: it shows the billed characters and the capacity of the message.
-
Click Add content, or Save changes if a message already existed.
The counter does not count the characters you typed but the ones that will be billed:
- The
STOP 00000notice (11 characters) is added to every campaign SMS so people can opt out. To fit in a single SMS, your text must therefore be 149 characters or less. - Each link counts as 20 characters, whatever its length: it is shortened when sent.
- A single special character (emoji, lower-case
ç, some symbols) drops the capacity of an SMS from 160 to 70 characters. The help text below the field tells you. - Beyond one SMS, the message is sent in several parts: the counter turns orange and the help text says, for example, This message is sent as 2 SMS and costs 2 credits per recipient.
If you use variables, the cost depends on each recipient: a long or accented first name can cost one more SMS. The help text then shows an estimate.
Send a test
Section titled “Send a test”Before sending, send the campaign to yourself to check how it looks.
-
At the bottom of the content window, expand Test this campaign.
-
Enter your email address, or your phone number for an SMS campaign. The field is labelled Sender email or Sender sms, but it really is the address or number that will receive the test.
-
Click Send test. The message Test campaign sent successfully! appears.
The test sends the saved content: click Save content first if you have just changed it. Good to know:
- The test email includes the unsubscribe notice, like real sends.
- The test uses no contact’s data: variables are not replaced. A test SMS shows variables as they are, for example
{{ firstname }}. - A test SMS costs one credit, refunded if sending fails.
- An address or number on your suppression list cannot receive a test: an error message appears.
Send now or schedule
Section titled “Send now or schedule”-
On the campaign card, click Send or Schedule.
-
The window reminds you of the recipients, for example Sending to Parisians · 128 contacts, then Segment of the audience SUBSOL customers 2026 if you chose a segment.
-
Choose Send now or Schedule.
-
To send right away, click Send now. The message Campaign is on its way! appears.
-
To schedule, choose the Send date and time, then click Schedule send. The message Campaign scheduled successfully! appears and the card switches to Scheduled.
The date must be in the future, otherwise the message Cannot schedule a campaign in the past! appears. The time is your computer’s time. The campaign leaves within the minute after the chosen time.
To change the time of a scheduled campaign, reopen Send or Schedule and pick another date. The screen does not offer a way to remove the schedule: you can send right away or delete the campaign. The content can still be edited until it leaves.
Who receives the campaign
Section titled “Who receives the campaign”The number shown in the send window is the number of contacts in the audience or segment. At send time, Sweescape leaves out:
- the people on your suppression list: unsubscribed, failed addresses, spam reports and manual unsubscribes (see Deliverability and unsubscribes);
- for an email, values that are not an email address and duplicate addresses (upper case does not count);
- for an SMS, duplicate numbers, even when written differently (
06…,+33 6…).
A segment is evaluated at send time: contacts added in the meantime who meet its conditions receive the campaign.
Follow a campaign’s status
Section titled “Follow a campaign’s status”| Badge | Meaning |
|---|---|
| Draft | The campaign is neither scheduled nor sent. The card shows the last modification date. |
| Scheduled | A send date is set. The card shows Planned: and the date. |
| Sending… | Sending is in progress. |
| Sent | Sending is finished. The card shows the send date and the Show Statistics button. |
| Send Error | Sending failed. The content can still be edited and you can send again. |
| Not enough credits | SMS campaign whose credit balance did not cover every recipient. See the next section. |
A Sending… or Sent campaign is locked: its content, name and schedule can no longer change.
Not enough SMS credits
Section titled “Not enough SMS credits”The credits of an SMS campaign are debited when it is sent: one credit per SMS and per recipient. Failed sends are credited back.
If your balance does not cover everyone, Sweescape sends to the recipients the balance can cover, then stops. The card switches to Not enough credits and the button becomes Resume sending. Buy credits from the SMS Credits menu, then click Resume sending and Send now: only the people who have not received the SMS yet get it.
Statistics and attributed revenue
Section titled “Statistics and attributed revenue”Once the campaign is sent, the Show Statistics button opens its details in SweeAnalytics, in a new tab: delivered recipients, opens (for an email), clicks, revenue brought in, most clicked links, unsubscribes and spam reports. Opens and clicks arrive with about ten minutes of delay. See Campaign statistics.
Revenue is attributed automatically: the campaign’s links carry a marker. When a recipient clicks a link to your ticketing page and buys right away, in the same tab of their browser, the order is linked to the campaign. Only confirmed orders count, and the last campaign clicked wins. A purchase made from another device, in another tab or after the tab was closed is not attributed.
Edit, duplicate or delete a campaign
Section titled “Edit, duplicate or delete a campaign”- Rename or change segment: click the pencil next to the name. It only appears on a Draft campaign that is not scheduled. The window lets you change the Campaign name and, if the audience has segments, the Send to field.
- Edit the content: Edit content button, as long as the campaign has not left.
- Delete: the bin on the card, after confirmation. It does not appear on a sent campaign or one being sent.
- Duplicate: there is no button to duplicate a campaign. Create a new one.
The audience, the channel and the promoted event cannot be changed after creation.