
Design the PDF ticket
The PDF ticket is the attachment of the invitation. It is made of a background, your design as a PDF, on which Sweescape prints each attendee’s details and personal QR code. Until this ticket is ready, no invitation goes out, not even after a purchase.
Some error messages call this PDF a “badge”: it is the same thing.
Prepare the background
Section titled “Prepare the background”Create your design in your usual tool and export it as a PDF:
- Format: a PDF file, 1 MB maximum. An image (JPG, PNG) is rejected with “Invalid file extension, please retry with a pdf file!”.
- A single page: the attendee details are placed on the first page. Portrait A4 is the format Sweescape uses with Canva.
- Free areas: keep some room, on a light background, for the name and the QR code.
Upload the background
Section titled “Upload the background”-
Open your event, then the Invitation tab.
-
In the Invitation design card, click the file field (it shows “event-invitation-base.pdf” while no background is uploaded) and choose your PDF.
-
The upload starts right away. The message “Badge created successfully!” confirms it, and the preview in the Your invitation card updates.
To change the design, simply upload another PDF. The details you already placed are kept in the same position: check that they still land in the right spot.
If the file is larger than 1 MB, the message “File is too large, max size is 1Mo!” appears: reduce the PDF’s weight (compressed images) and try again.
Place the details and the QR code
Section titled “Place the details and the QR code”-
In the Your invitation card, click Customize your invitation. If no background is uploaded, the message “Please upload a badge template first!” appears.
-
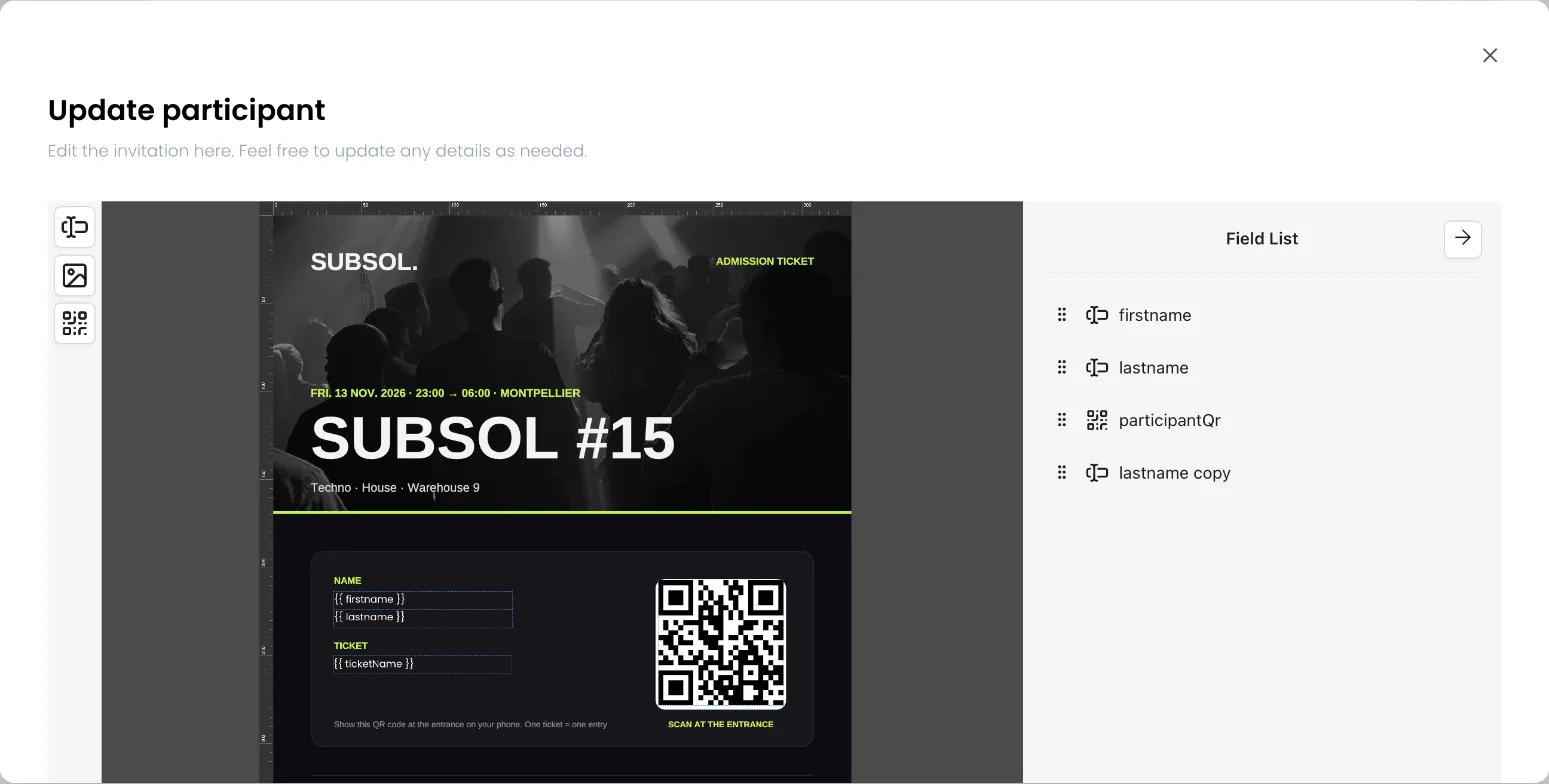
The PDF editor opens on your background. The first time, Sweescape has already placed, stacked in the top left corner:
- one field per attendee detail: email, first name and last name for a ticketed event, plus your custom fields; the columns of your file for an imported event;
- the attendee’s QR code.
-
Drag each field into place and resize it. Delete the fields you do not need. By default, the right panel, Field List, lists the fields placed on the ticket. When you select a field, it switches to Edit Field and shows its settings: position and size, then, for a text, the font, size, colour and alignment.
-
Click Update. The message “Badge template saved successfully!” confirms it.
What each field contains
Section titled “What each field contains”A text field shows its content with the variables in double curly braces replaced by the attendee’s details: {{ firstname }} becomes their first name, {{ email }} their address. You can write text around them, for example Welcome {{ firstname }}. If the attendee does not have that detail, the variable is replaced with nothing.
To show the ticket type (“Early bird”, “VIP”…), add a text field whose content is exactly {{ ticketName }}, with no other text.
The QR code contains the attendee’s unique identifier. It does not open with a phone camera: only SweeScan can read it.
Tips for a QR code that scans well
Section titled “Tips for a QR code that scans well”- Make it comfortably large and place it on a white or very light area.
- Leave an empty margin around it, with no text or pattern touching it.
- Keep it away from edges and folds if the ticket will be printed.
Check the result
Section titled “Check the result”In the Participants tab, click the gear icon of an attendee, then View the participant PDF: their invitation page opens with the PDF built from the current design. The PDF attached to the email is named “badge_” followed by the event name.
Create the design in Canva
Section titled “Create the design in Canva”If you work in Canva, Sweescape can create the design for you, then fetch the PDF automatically.
-
Connect your Canva account: account menu in the top right corner, Settings, External connection card, then Connect on the Canva line. Until Canva is connected, the Edit with Canva button is greyed out and a Do you want to use Canva? link leads to that page.
-
In the Invitation tab, click Edit with Canva. The first time, Sweescape creates a portrait A4 design in your Canva, named after your event followed by “Sweescape Design”, and opens it. After that, the same design opens.
-
Build your design in Canva, without the name or the QR code: Sweescape adds them.
-
Come back to Sweescape with the return button Canva offers. A “Your design is being exported!” page appears while Sweescape exports the design as an A4 PDF and sets it as the ticket background, then takes you back to the event.
-
If this is your first background, place the details and the QR code, then click Update.
Ask the AI for advice
Section titled “Ask the AI for advice”The magic wand icon at the top of the Your invitation card asks artificial intelligence for suggestions to improve your design. Each request uses your AI credits: see Artificial intelligence in Sweescape.